Showing posts with label photograph. Show all posts

Friday, June 12, 2009

File Organization Tool Tutorial

How do you organize your files? Do you organize?!

I know I said that I would give you some more tutorials from my layout the other day, but this one is relevant to what I am working with right now and wanted to share this. This is about what I use to organize my photos and digital scrapbooking files. I am not sure if people bother to organize their files and folders very much, but I do. I do it mainly so that I can find files later and always try to think ahead at what I might use to search for something later.

The best program I have found, and have been using it for years now, is called ReNamer by den4b. It is fantastic because it is so simple. At first I used it to organize my photos, and now have found it useful for digital scrapbooking.

Photos:
I keep all of the photos from the same date or event in a folder together. I name each of them according to the date the picture is taken and then I number them sequentially in the order they were taken. If the pictures were taken at a specific location (e.g., the Grand Canyon) or event (e.g., Christmas), I will add that after the date and serial number. If I have time, I will add who is in the picture at the end. Here's an example of a typical file name: 20080803_13_Brooklyn_MarkErin.jpg. I date my pictures with the year first, then the month, and then the day. I have found by trial and error that that is the best way to organize photos in some kind of orderly fashion. As you can see in this example, if I ever use the search to find pictures of my trip to Brooklyn or of Mark, both searches will yield this photograph. Well the focus is supposed to be on digi-scrapping files, so let us move on to that.

Digi-scrapping files:
Now I am new to digi-scrapping so this is still trial and error, but I will tell you about the system I am using right now to organize any kits I purchase or freebies I find online. First I group all items for one kit into one folder and name it {Kit_DesignersInitials_KitName}. I start with "Kit" so that all of the kits will group together. Then I like to have the work of the same designer side by side because I have a habit of remembering the name of the designer instead of kit names. So if I am looking for a kit, it is more likely that I will find it under the designers name.

Once inside the folder, I try to make sure everything in the folder has the same information as the folder. So I rename everything to start with {DesignerInitials_KitName}. I do this so that if I ever do a search for a tag, I will know exactly what kit the tag I am using came from just by the file name. Then I can find the designer's TOU (terms of use) in no time. It is easy to give appropriate credit when you know the name immediately. I also try to make sure common things like buttons, ribbons, pins, staples, tags, and paper are labeled in the file name so that I can do a quick search and find whatever I am looking for.

So what I wanted to do is tell you how to do all of this file renaming efficiently.

Tutorial:
First a disclaimer. I am sure that this program offers more than I know. I am just showing you some of the things I know to do with it.

Okay, so I am going to organize a folder that I downloaded from the SYTYCD contest at digiscrapaddicts.com (no longer available).

Now the first thing I do is find the TOU and the kit preview and put a underscore ("_") in front of these file names. This is my own thing, my own pet peev. I want to be able to find these two files anytime, and by doing this, these two files will be displayed as the first two files in the folder.

Now we can start using ReNamer.

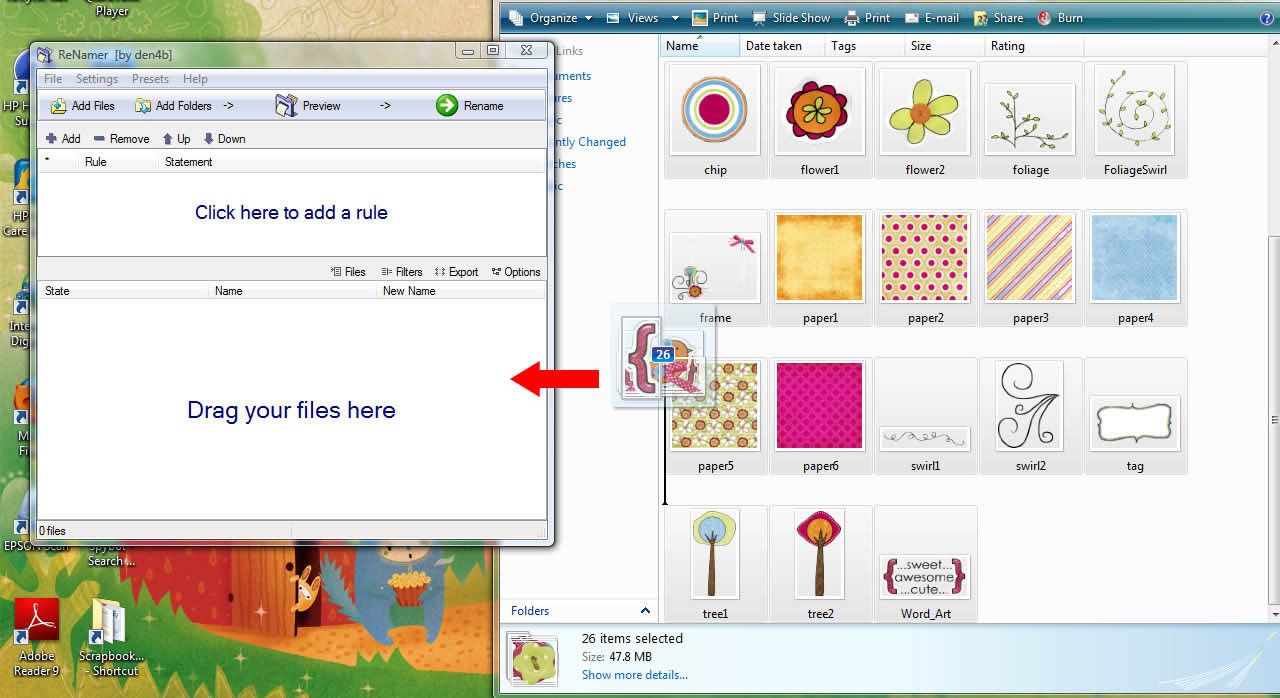
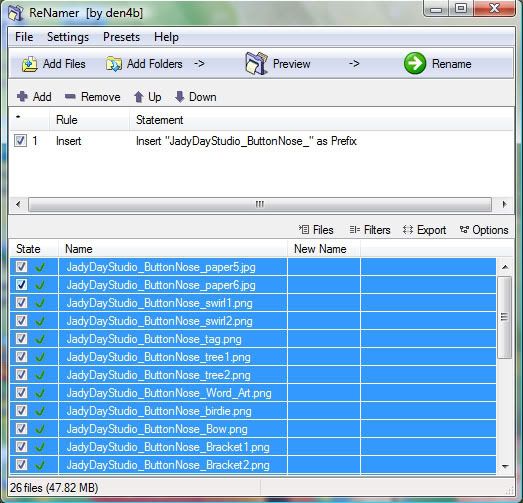
Open ReNamer. Start by selecting all of the files that need to be renamed. To quickly do this use your mouse. Select the first file, hold down shift, scroll down, and then select the last file. Now drag all of those files into the bottom window of ReNamer that says "Drag your files here."
alternative text

Now your files are loaded in ReNamer.
alternative text

Next, click on "Add" to add a rule to rename the files.
alternative text

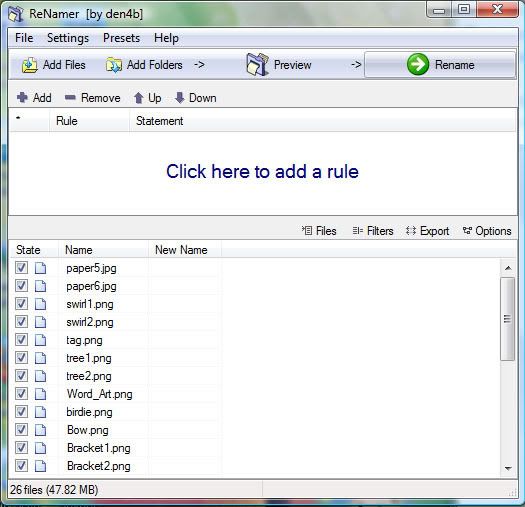
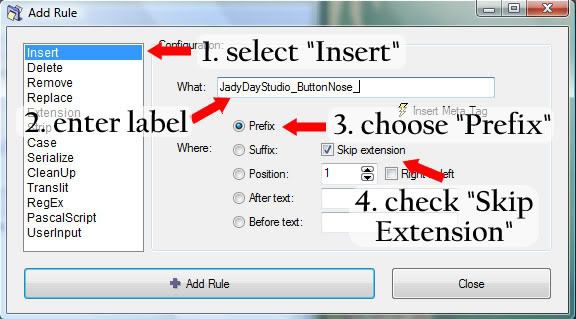
Below is the screen that opens. We are going to create a rule using "Insert" on the left.
alternative text

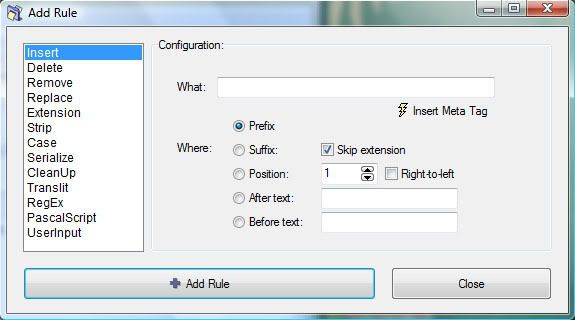
Next, place your cursor in the field next to "What:". We want to add the name of the designer and the kit name. I want to put this information in the front of the file name, so I select "Prefix" and make sure that "Skip Extension" is checked.
alternative text

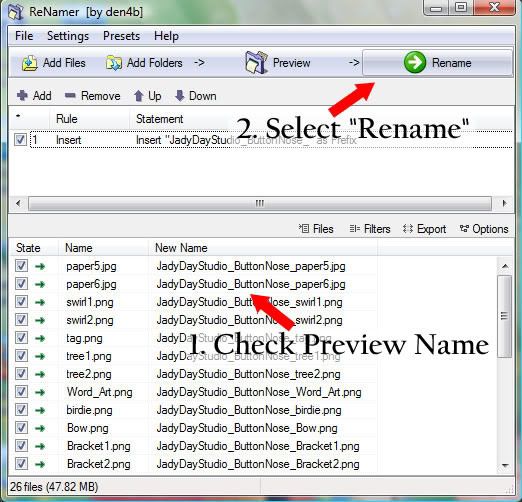
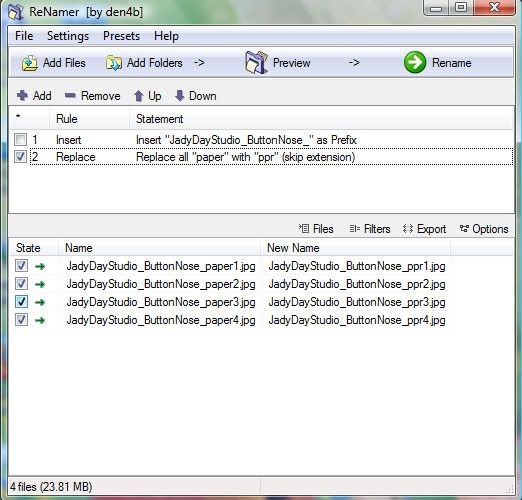
Once you have entered this information, you can click "Add Rule." This will close the window and return you to the original screen. In the screen you can now see a preview of what the file name will be with this rule you just created.

If you are happy with the new file name then you can go ahead with the renaming by clicking "Rename."
alternative text

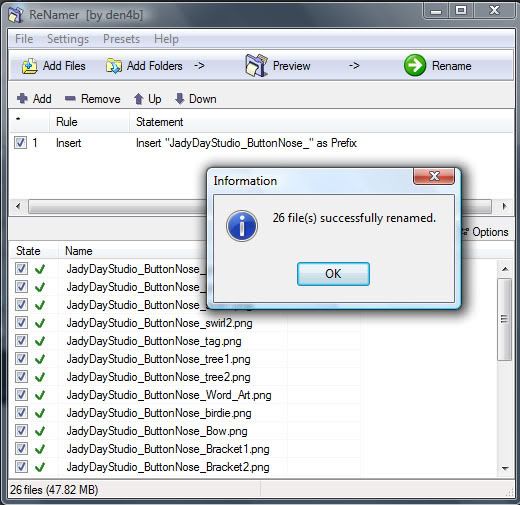
It will tell you if your renaming is successful. Click OK.
alternative text

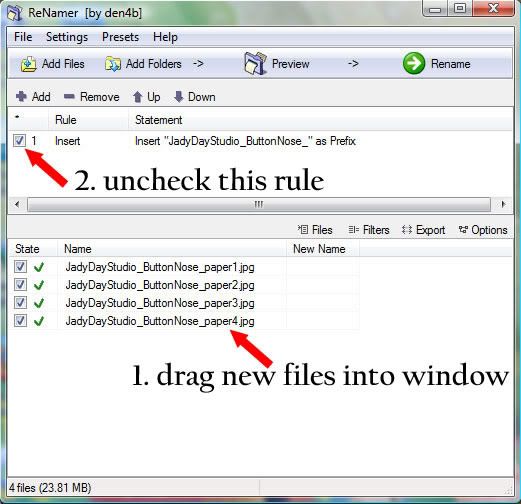
Now that these files are renamed you can remove them. Just select them (if you click in the window you can use "Ctrl+A" to select all) and hit the "delete" key. In the picture below I have selected all of the files, just before deleting.
alternative text

Now I want to change some other files. The designer has labeled the papers as "paper," which might work for you. But I like to use the search and when I search for paper I want to find notebook paper and things like that, not 1000s of papers, so I change "paper" to "ppr." It is just my way of creating it easy to search. So I drag the papers into ReNamer.

Then we need to turn off the rule we created above. Just check to turn it off. This is a cool technique because you can create several rules and work with many many files without having to rewrite rules each time you need to do something different.
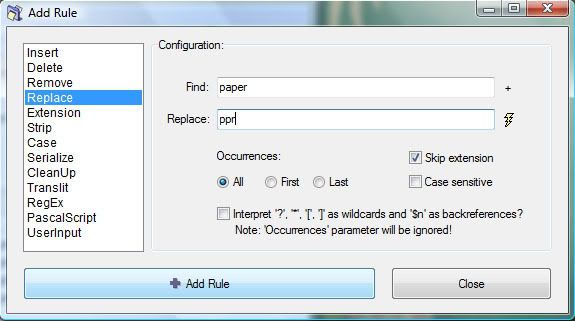
alternative text

Next click "Add."

This time we want to add another rule, using the Replace rule. So select "Replace." Then where it says "Find:" I will enter paper, and where it says "Replace:" I will enter ppr. Then click "Add Rule."
alternative text

This will preview the new name. Select "Rename." And then click "OK".
alternative text

There, we are done renaming the files.

There is a lot more I can share with you about ReNamer, but I will save that for another night.

Here is where you can find ReNamer: http://www.den4b.com/downloads.php?project=ReNamer.

Thursday, June 11, 2009

and...A Class

I came across an announcement for a free class about photo editing at JessicaSprague.com and thought I'd pass it along. It appears to me to be for Photoshop users, but I figure even those of us that use Photoshop Elements can learn something from it.
alternative text

Tuesday, June 2, 2009

Creating a Stroke in Photoshop Elements

alternative text

Again, my focus is to help new digi-scrappers, focusing on those also new to Photoshop Elements (and in particular, version 7.0, which is probably what you'll be using if you just bought it).

Scrapper's Guide seems to be filled with really good tips and tricks. So, once again I bring you a tutorial from them. It's on how to create a stroke. They provide directions for Photoshop Elements and Adobe Photoshop. Please visit these links to do the above.

Also note that if you want to put a stroke around a picture, this is the tool that you use.

Here's a quick tutorial to put a stroke (or border) around a picture:

1) You have your photo open in Photoshop Elements and are ready to insert a stroke around the photograph.

alternative text

2) First, select the photo layer.

alternative text

3) Next, go to Edit in the top menu

alternative text

4) Then, select Stroke (Outline) Selection

alternative text

5) In the stroke window, make your selections. In the tutorial mentioned above (the Scrapper's Guide), they chose an "inside" stroke which creates crisp corners. Here I choose an outside stroke, which creates rounded corners. You will have to use trial and error to determine what width of stroke to use. Select "OK" when you are finished.

alternative text

6) The stroke is now wrapped around your picture.

alternative text

7) And you are all finished (I added a drop shadow).

alternative text


Sunday, May 24, 2009

Texture on Photographs

My favorite scrapbooking designer is Summer Driggs of Summertime Designs. She does such amazing work! Back in March she offered a tutorial on how to add texture on photographs. The trouble was that she did it using Photoshop while I only have Photoshop Elements. Therefore, I decided, once I figured out how to do it, to create a tutorial of the same thing for you specifically for Photoshop Elements.

Before Photo


After Photo

1. Start by opening your photo in Photoshop Elements.

opening window

2. Since I'm following Summer's tutorial, the next step she likes to do is adjust the levels. You can skip steps 2 and 3 if you would like. To do this make sure your picture is highlighted in the layers section to the right. Then click "Enhance" > "Adjust Lighting" > "Levels".

adjust levels

3. Move the tabs around to adjust the levels until you are pleased with your results. In Summer's tutorial she shows you exactly what she does. I will simply describe it. First, move the white tab on the right and move it slightly to the left. Next, move the black tab, on the left, over slightly to the right. Then move the middle gray tab to the left or right as needed. When you are done you can uncheck the "Preview" button to see the before picture to compare the changes.

4. To create a grungy look, you will need to find a texture to use to create an overlay. There are many textures available on the Internet. People also like to photograph textures themselves. For this tutorial I am using a texture that I found at http://www.deviantart.com. It is called "Forgotten Texture" by Firesign24_7 from this link: http://firesign24-7.deviantart.com/art/Forgotten-texture-117652416.

5. You should be viewing your picture on Photoshop Elements at this point. Next open the texture in Photoshop Elements. You need to be able to see both your picture and your texture at the same time. So if they are not both visible, click on the "Restore Down" in the upper-righthand corner of the viewing box, which is located to the left of the "X", it will have two small squares---one on top of the other. For the next step you need to click on the "Move Tool" on the top left of the toolbar.

open texture

6. Next you want to drag the texture onto the picture. Now that you are viewing both the texture and the picture AND have selected the "Move Tool", it is real simple to move the texture onto the picture. Just grab the texture and drag it over onto the picture. In the texture window (in my example it is on the right), click the "X" in the upper right corner of the viewing window to close the texture window. You will no longer need it.

drag texture onto pictures

7. Once you do this, you will just be viewing the picture window, which has both your picture and texture on it. In the layers panel you will see that the texture layer is above the picture layer.

drag texture onto pictures

8. Next you want to make sure that the entire texture is covering the picture. Since both of these are photographs, my texture fit perfectly over the picture. To adjust your texture, make sure that the texture layer is selected by choosing it in the layers panel. Then using the bounding boxes at the sides and corners of the texture adjust the texture so that it is the same size as the picture. After making the adjustments, you will need to select the green check mark or hit the enter key to affirm your changes. Now the texture is covering the whole background.

9. Now make sure the texture layer is selected by looking in the layer panel, and clicking on it if it is not selected. Then click the drop down blending mode, by clicking on the selection area that says "Normal" below the Layer Panel heading.

select the texture layer

10. From the list that appears, choose "Overlay". You can also play around with the other options in this group and see what effects they create. You can select: "Soft Light," "Hard Light," "Vivid Light," "Linear Light," "Pin Light," or "Hard Mix."

Select Overlay

11. You are almost finished.

Overlay

12. Next we will remove the texture from the bodies of the people, which gives a cleaner fresher look. I only remove the texture from the people that the picture focuses on, not those in the background. Here is a close up. It helps to zoom in to make sure you are careful and stay along the edges.

Closeup

13. The erasing takes place on the texture layer, revealing the picture beneath. Make sure that you have the texture layer selected in the layer panel. To erase, select the "Eraser Tool". You can adjust which brush is selected (choose a round one, for example), and the size of the brush at the top of the viewing window. A smaller size helps around details (here I am using size 23).

Eraser Tool

14. Tada! You are finished. Note: Summer uses the burn tool at the end of her tutorial, which you can do in Photoshop Elements. However, I did not use it because the texture I used created a similar effect on the edges of my picture that I was happy with.

Eraser Tool