I'm scared to death to try doing any kind of clustering on my layouts. When I am brave enough to try it I give up pretty quickly because it is so challenging! It just looks stupid when I try.
I haven't shared any tutorials from other sites with you in a while, but did not want to pass up the chance to direct you to this one about clustering that was posted at The Daily Digi this weekend. Definitely take the time to check out this lengthy, but very useful guide to clustering. Click here to go to the tutorial. Maybe now after reading it I will be brave enough to give it another try.
Happy Scrapping!
Showing posts with label tutorial. Show all posts
Showing posts with label tutorial. Show all posts
Monday, February 15, 2010

Friday, December 4, 2009
Great Tutorial on How to Use Templates
 |  |
The only template I've ever made. Please feel free to snag it. (click template image to download)
When I started this blog I really concentrated on helping new digi-scrappers. As I've grown in my scrapbooking skills I have gotten away from that and kind of forgotten what would be typical questions from a newbie-scrapbooker. It was a lot easier when I was one myself. Funny how scrapping over 6 months and making approximately 75 layouts has brought me this far. And I am sure to many digi-scrappers out there I am just scratching the surface! But I am working on it. I have been scrapping up a storm these last few weeks---making about two a day for a couple of weeks. But the creative juices are starting to dry up and my momentum is slowing down.
Anyway, all of that to say that I came across a great video that will help someone newer to digi-scrapping. It is how to use templates. I know there are lots of good tutorials on this, but I still learn something new when I watch them because everybody has a different way of going about scrapping. It helps me learn the ins-and-outs of the program better.
Today's tutorial is by Cathy Zielske. I love her style, personality, and her templates and if I were not cheap I probably would own all of her templates for square pages. Here's a link to her tutorial on templates: http://vimeo.com/7968334 and here's a link to her blog: http://cathyzielske.typepad.com/my_weblog/2009/12/video-tutorial-working-with-layered-templates.html. What is even neater is that she turned this into a hybrid page when she was finished doing the digital part, so be sure to check out her blog.
Saturday, July 18, 2009
Applying Drop Shadows to Many Layers
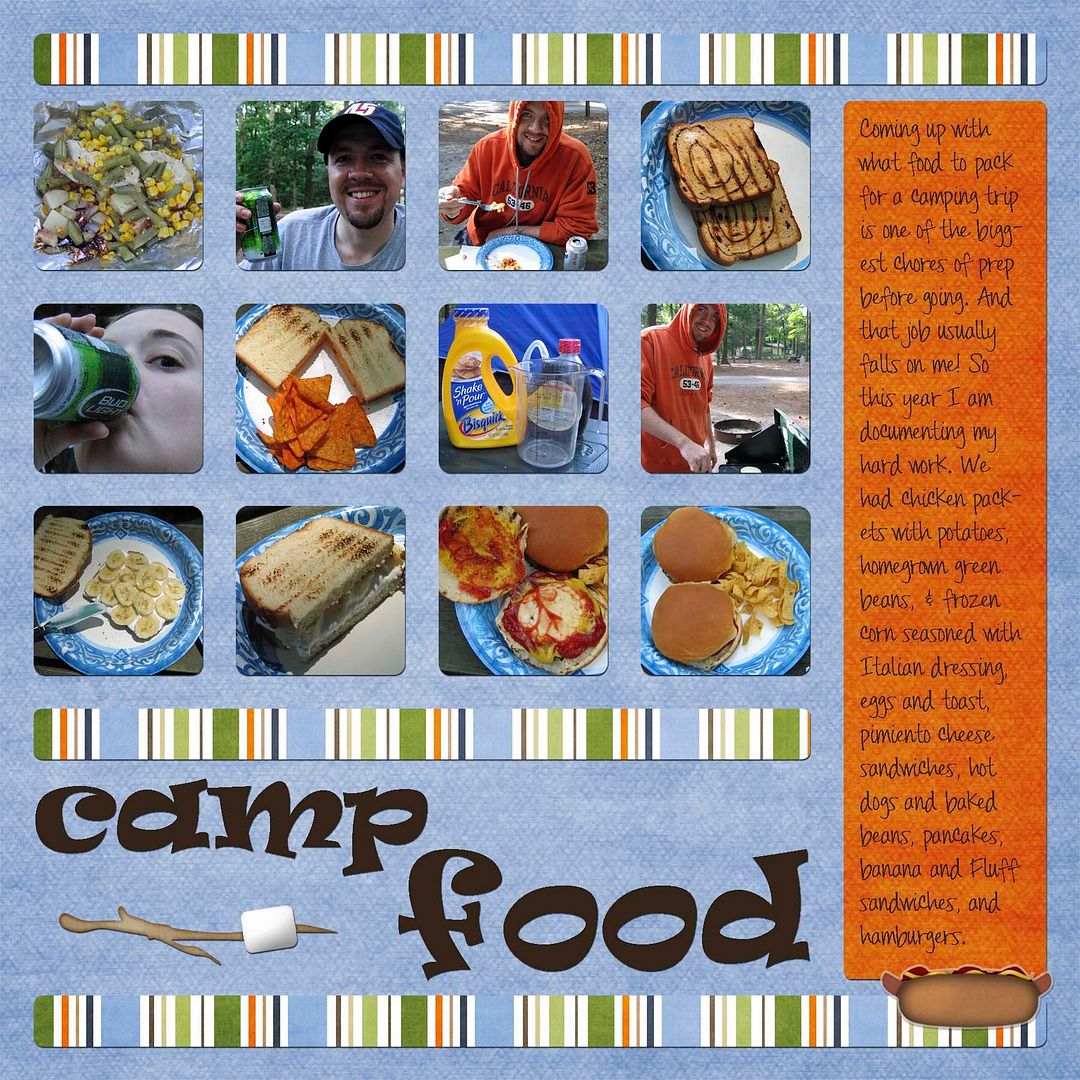
So you have a layout with a lot of layers that need the same drop shadow applied as in my layout below. Do you really want to adjust each one by one? No! There is a faster way.
Today I am going to show you a quick way to apply a drop shadow layer style to as many layers as you would like.
First, apply a drop shadow to one layer as you normally would do.
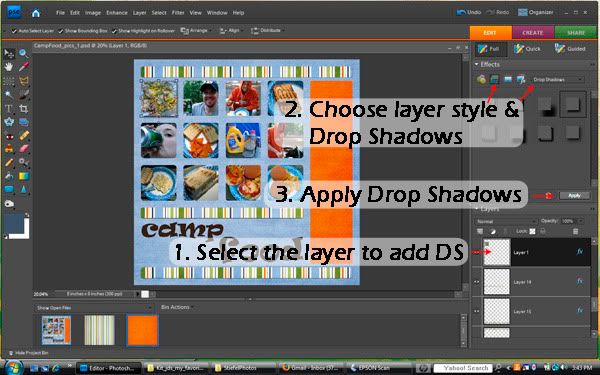
1. Select the layer that you want to apply the drop shadow (DS) to.
2. Under the effects panel, choose the layer style button, and select Drop Shadows.
3. Select the drop shadow of your choosing and click "Apply."
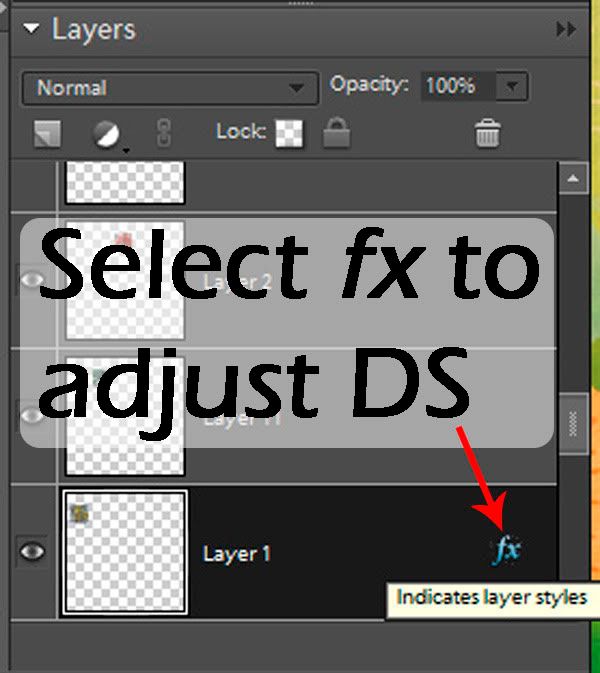
To adjust the default drop shadow (DS), select the effects (fx) symbol on the right side of the layer in the layer panel.
Now change the default settings by adjusting the Size, Distance, and Opacity.
You can play around with this to your liking. I personally like to have small, dark drop shadows. When they are fuzzy they appear to me that the items on the page are floating in the air, so that is why I choose a low number for distance.
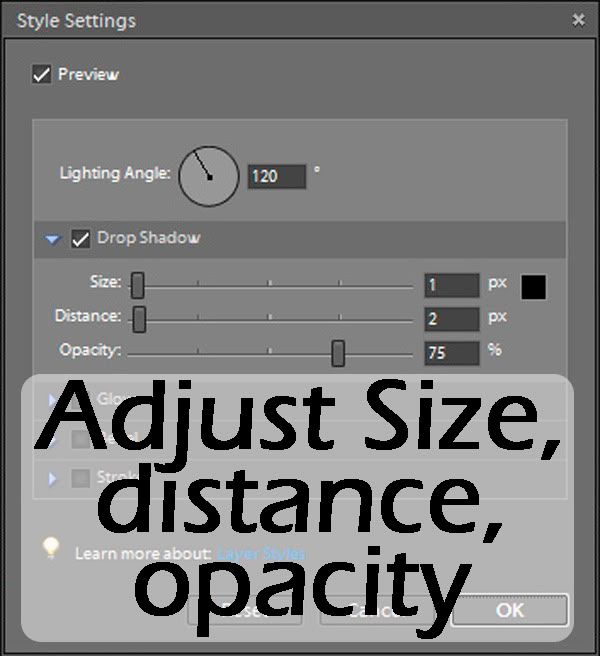
Click "Ok" when you are finished adjusting the drop shadow.
Next we will apply this setting (drop shadow layer style) to as many other layers as you would like. First we must copy the layer style and then paste it onto the other layers.
So, check to make sure that the layer is still selected in the Layers panel on the right.
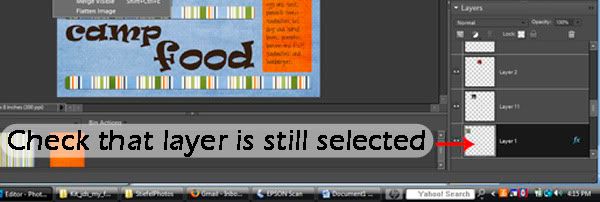
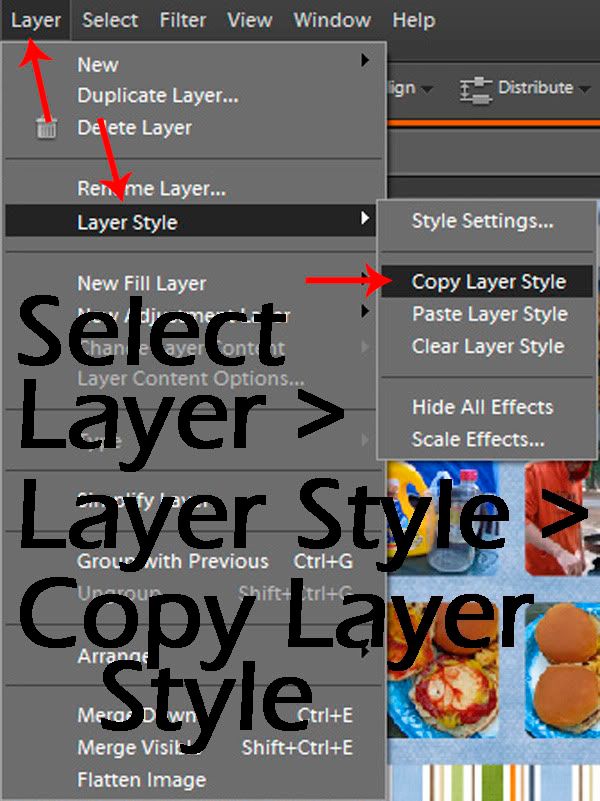
Then go up to "Layer" in the menu along the top of the screen, select "Layer Style" and then "Copy Layer Style."
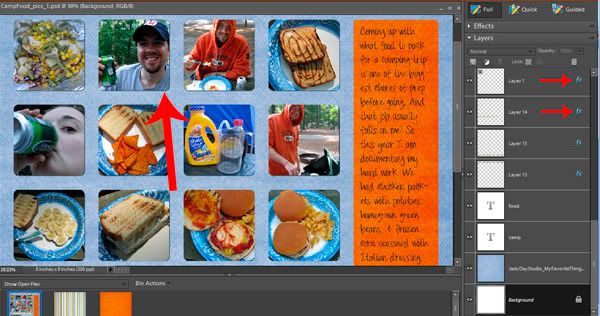
Today I am going to show you a quick way to apply a drop shadow layer style to as many layers as you would like.
First, apply a drop shadow to one layer as you normally would do.
1. Select the layer that you want to apply the drop shadow (DS) to.
2. Under the effects panel, choose the layer style button, and select Drop Shadows.
3. Select the drop shadow of your choosing and click "Apply."
To adjust the default drop shadow (DS), select the effects (fx) symbol on the right side of the layer in the layer panel.
Now change the default settings by adjusting the Size, Distance, and Opacity.
You can play around with this to your liking. I personally like to have small, dark drop shadows. When they are fuzzy they appear to me that the items on the page are floating in the air, so that is why I choose a low number for distance.
Click "Ok" when you are finished adjusting the drop shadow.
Next we will apply this setting (drop shadow layer style) to as many other layers as you would like. First we must copy the layer style and then paste it onto the other layers.
So, check to make sure that the layer is still selected in the Layers panel on the right.
Then go up to "Layer" in the menu along the top of the screen, select "Layer Style" and then "Copy Layer Style."
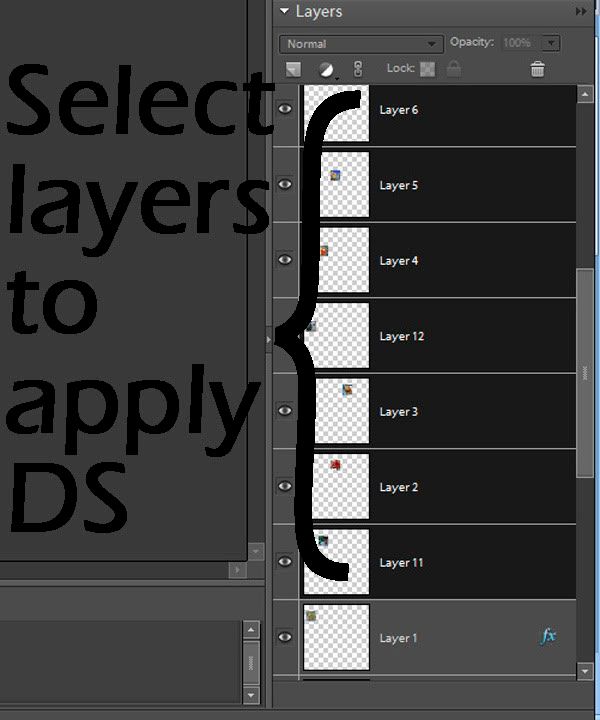
Then in the Layers panel, select all of the layers that you would like to apply the same drop shadow to. In my example, it is the other eleven squares in the grid.
Now, go back up to the "Layer" in the top menu, select "Layer Style," and this time choose "Paste Layer Style."
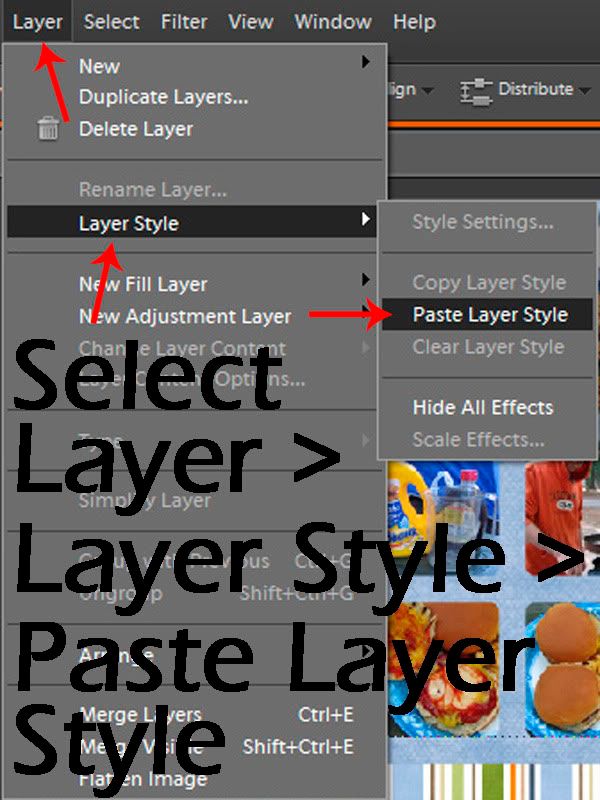
And you are done---the shadow is applied to all of the layers you selected.
CREDITS for layout: Page Kit "My Favorite Thing" by Jady Day Studio from SYTYCD contest.
Thursday, July 9, 2009
Creating Realistic-Looking Splatter in Photoshop Elements
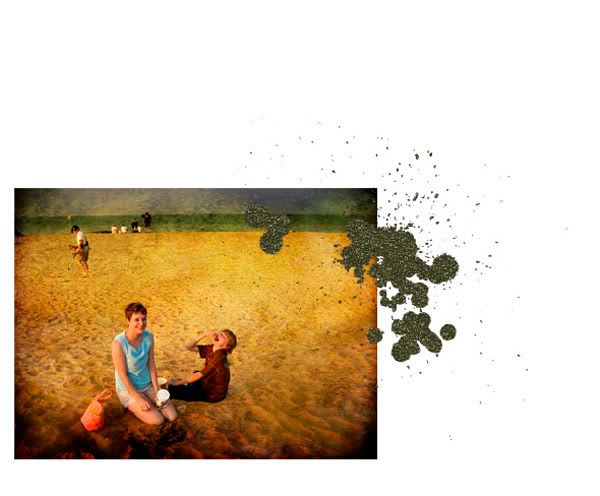
Today I want to show you how to create realistic-looking splatter in PSE. I did this for a recent layout and when I printed it out it looked awesome. Here's a close-up of the section of my layout.

First, create a new layout or go to the layout you are working on where you have added splatter. Put the splatter partially going over the edge of a piece of paper or a photo. For now, keep the photo nice and square, don't tilt it any direction---just straight.
Credits: Kit is Wild Child by Snowflake Beach DesignsI am working in PSE 7.
First, create a new layout or go to the layout you are working on where you have added splatter. Put the splatter partially going over the edge of a piece of paper or a photo. For now, keep the photo nice and square, don't tilt it any direction---just straight.
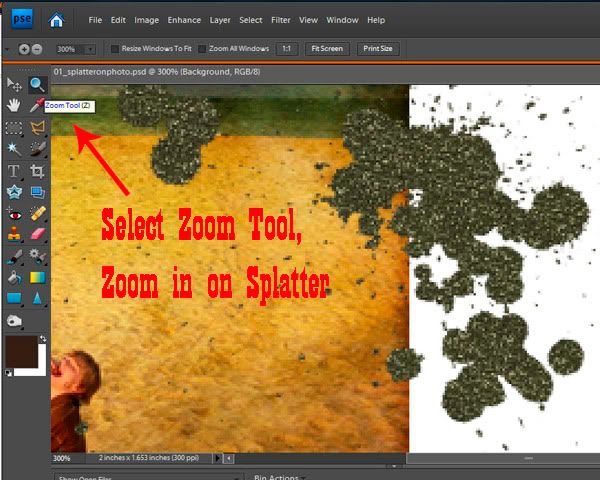
Use the Zoom Tool to zoom in on the splatter. A quick way to get the Zoom Tool is to type the letter "Z."
Next add the grid over your photo. It will help in this process.
To do this select View from the top menu, and then Grid from the drop-down menu.
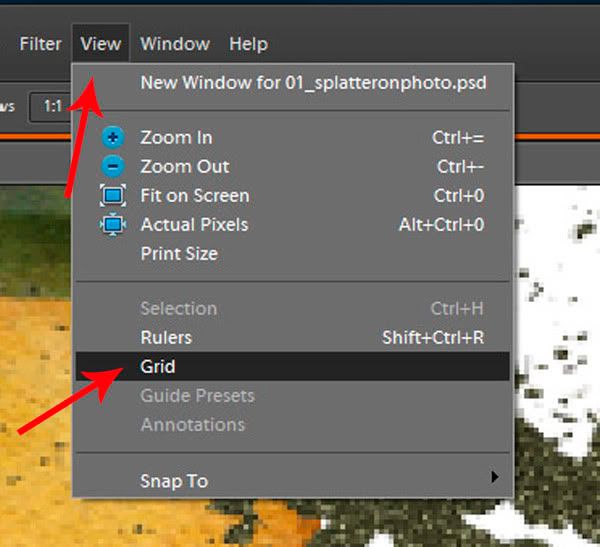
To do this select View from the top menu, and then Grid from the drop-down menu.
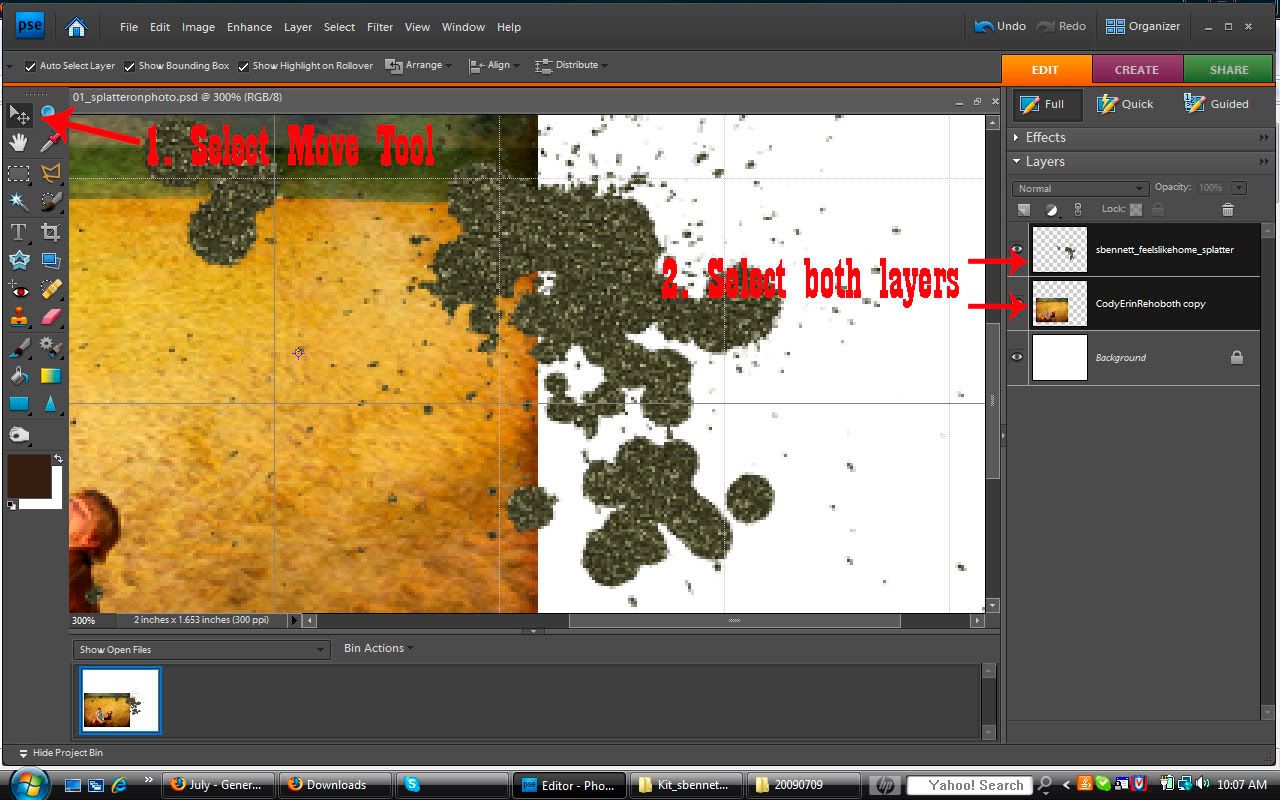
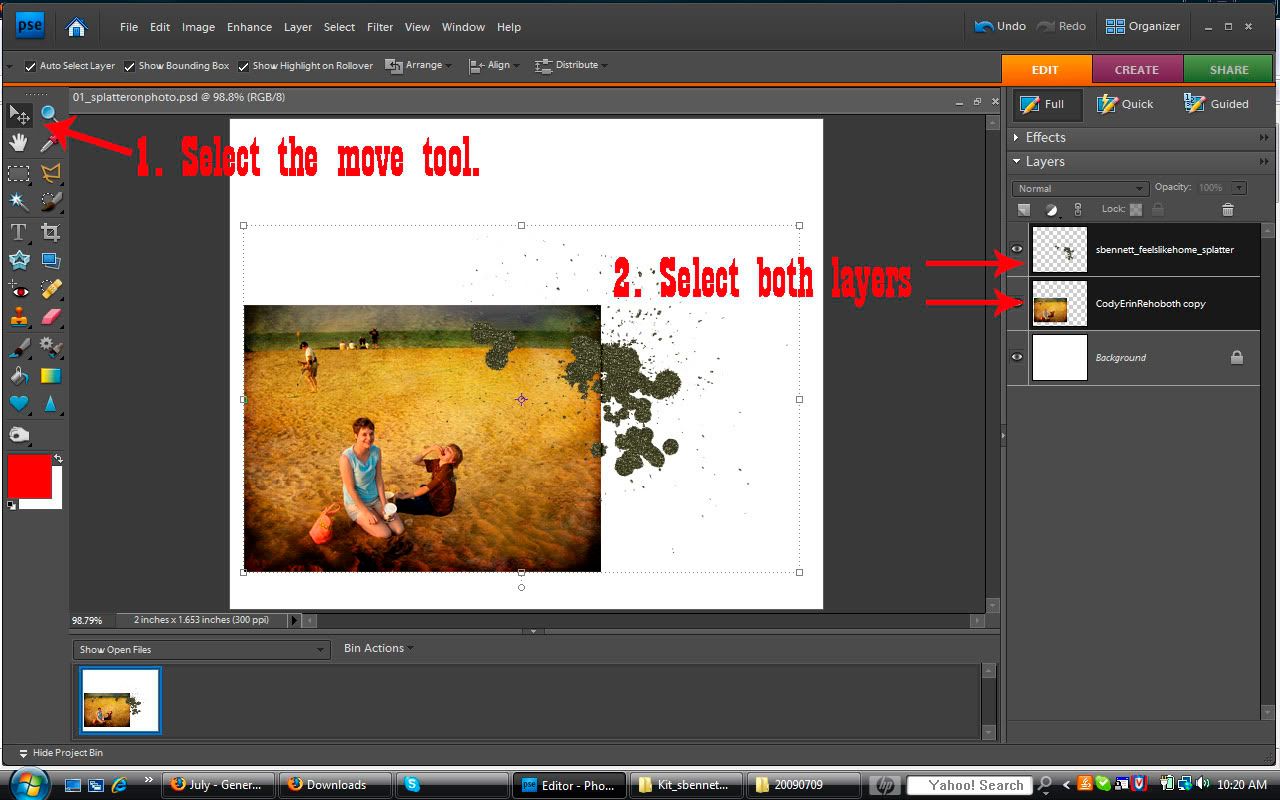
Next, select the Move Tool in the left column. A quick way to access the Move Tool is by typing the letter "V." Then while holding down the Ctrl key select both the photo layer and the splatter layer by clicking on each layer in the layer panel on the right side of the screen.
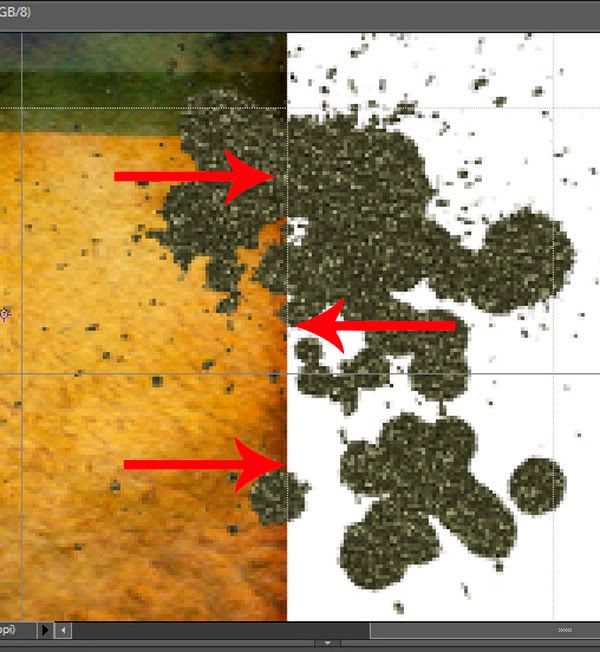
Now, slide your picture and splatter over so that the photo's edge lines up with one of the grid lines. The purpose of this is to give you a guide to follow.
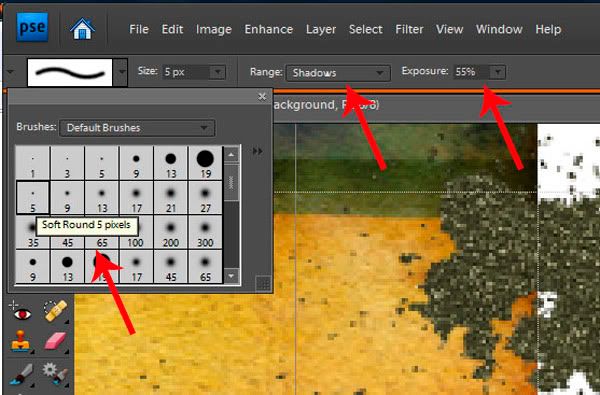
Now go to the left side to the tools menu and select your Brush Tool (or select it by typing the letter "B"). From the style drop down along the top choose a soft round brush. Set it to size 5 or smaller. Choose "Shadows," and set the exposure to about 50%.
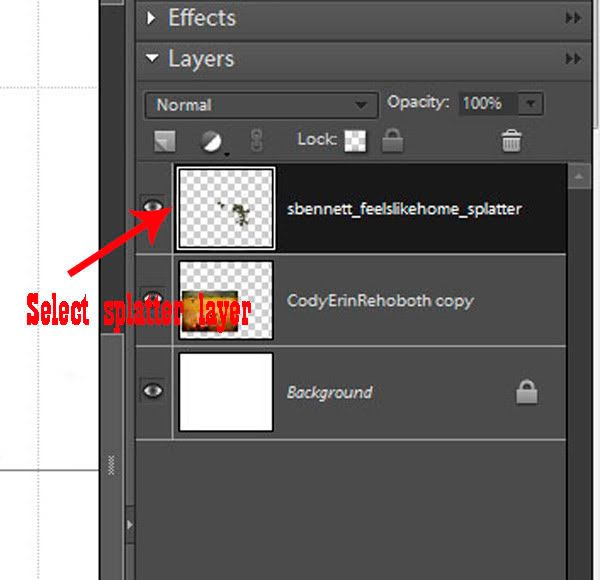
Next you want to make sure you are only working on the "splatter" layer, so select it in the layer panel on the right side of the screen.
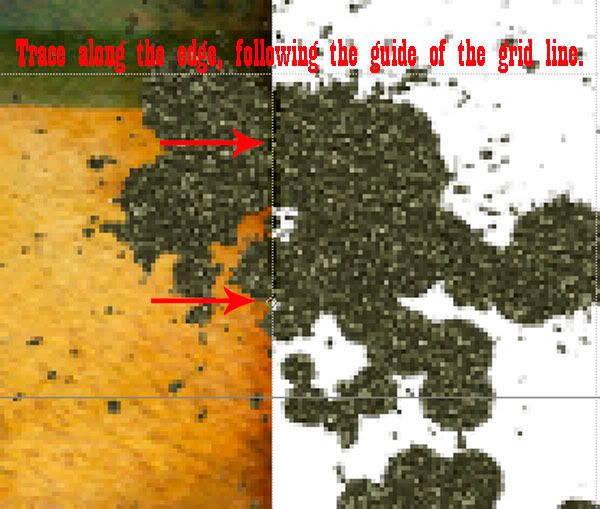
Using the brush, trace along the edge of the photo following the grid line running the brush across the splatter.
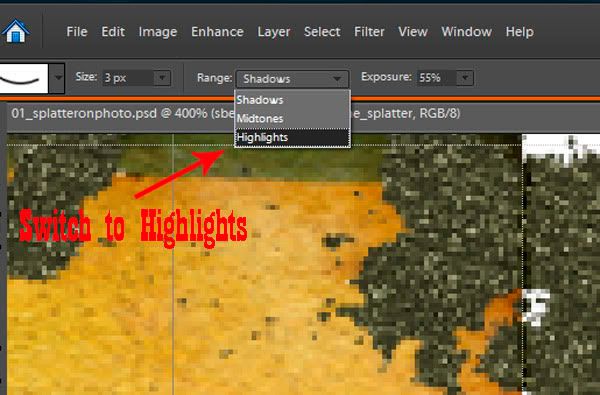
Next, still using the brush tool, change the setting to range "Highlights." Then trace along the line again. You have to do this if the splatter is glitter since there are also bright speckles in the splatter.
Now you are almost finished. You are finished with the brush tool and can zoom back out. A quick way to zoom out is to hold down the Ctrl key and press 0.
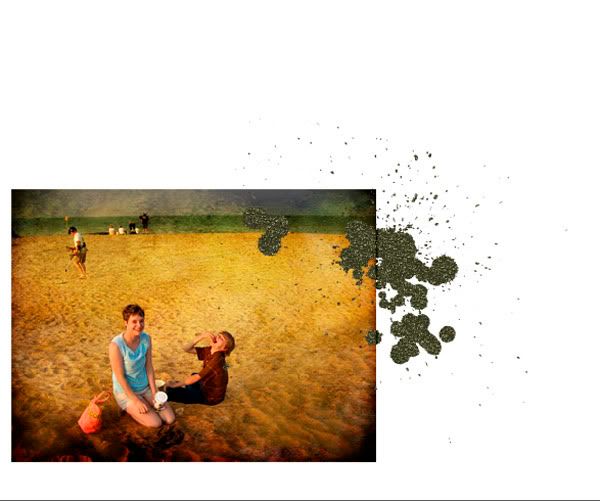
Grab the Move Tool (letter "V") again. Then select the two layers (photo and splatter) in the layers panel.
Now move the cursor over to the bounding box that outlines both the photo and splatter and move it around near the corner until a rounded double-headed arrow appears. Use this to rotate the photo and splatter the way you would like it to sit on the page.
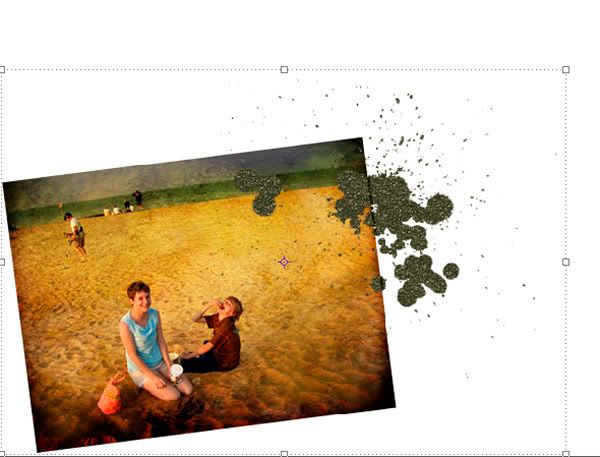
You are finished!
Credits: Splatter by Sarah Bennett from "Feels Like Home" and photo by Elise Cole

Friday, June 12, 2009
File Organization Tool Tutorial
How do you organize your files? Do you organize?!
I know I said that I would give you some more tutorials from my layout the other day, but this one is relevant to what I am working with right now and wanted to share this. This is about what I use to organize my photos and digital scrapbooking files. I am not sure if people bother to organize their files and folders very much, but I do. I do it mainly so that I can find files later and always try to think ahead at what I might use to search for something later.
The best program I have found, and have been using it for years now, is called ReNamer by den4b. It is fantastic because it is so simple. At first I used it to organize my photos, and now have found it useful for digital scrapbooking.
Photos:
I keep all of the photos from the same date or event in a folder together. I name each of them according to the date the picture is taken and then I number them sequentially in the order they were taken. If the pictures were taken at a specific location (e.g., the Grand Canyon) or event (e.g., Christmas), I will add that after the date and serial number. If I have time, I will add who is in the picture at the end. Here's an example of a typical file name: 20080803_13_Brooklyn_MarkErin.jpg. I date my pictures with the year first, then the month, and then the day. I have found by trial and error that that is the best way to organize photos in some kind of orderly fashion. As you can see in this example, if I ever use the search to find pictures of my trip to Brooklyn or of Mark, both searches will yield this photograph. Well the focus is supposed to be on digi-scrapping files, so let us move on to that.
Digi-scrapping files:
Now I am new to digi-scrapping so this is still trial and error, but I will tell you about the system I am using right now to organize any kits I purchase or freebies I find online. First I group all items for one kit into one folder and name it {Kit_DesignersInitials_KitName}. I start with "Kit" so that all of the kits will group together. Then I like to have the work of the same designer side by side because I have a habit of remembering the name of the designer instead of kit names. So if I am looking for a kit, it is more likely that I will find it under the designers name.
Once inside the folder, I try to make sure everything in the folder has the same information as the folder. So I rename everything to start with {DesignerInitials_KitName}. I do this so that if I ever do a search for a tag, I will know exactly what kit the tag I am using came from just by the file name. Then I can find the designer's TOU (terms of use) in no time. It is easy to give appropriate credit when you know the name immediately. I also try to make sure common things like buttons, ribbons, pins, staples, tags, and paper are labeled in the file name so that I can do a quick search and find whatever I am looking for.
So what I wanted to do is tell you how to do all of this file renaming efficiently.
Tutorial:
First a disclaimer. I am sure that this program offers more than I know. I am just showing you some of the things I know to do with it.
Okay, so I am going to organize a folder that I downloaded from the SYTYCD contest at digiscrapaddicts.com (no longer available).
Now the first thing I do is find the TOU and the kit preview and put a underscore ("_") in front of these file names. This is my own thing, my own pet peev. I want to be able to find these two files anytime, and by doing this, these two files will be displayed as the first two files in the folder.
Now we can start using ReNamer.
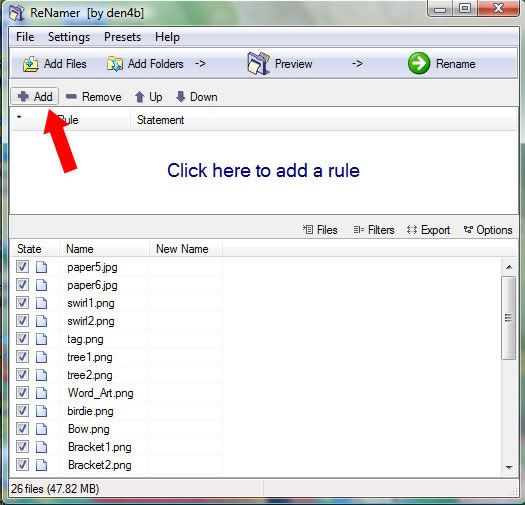
Open ReNamer. Start by selecting all of the files that need to be renamed. To quickly do this use your mouse. Select the first file, hold down shift, scroll down, and then select the last file. Now drag all of those files into the bottom window of ReNamer that says "Drag your files here."
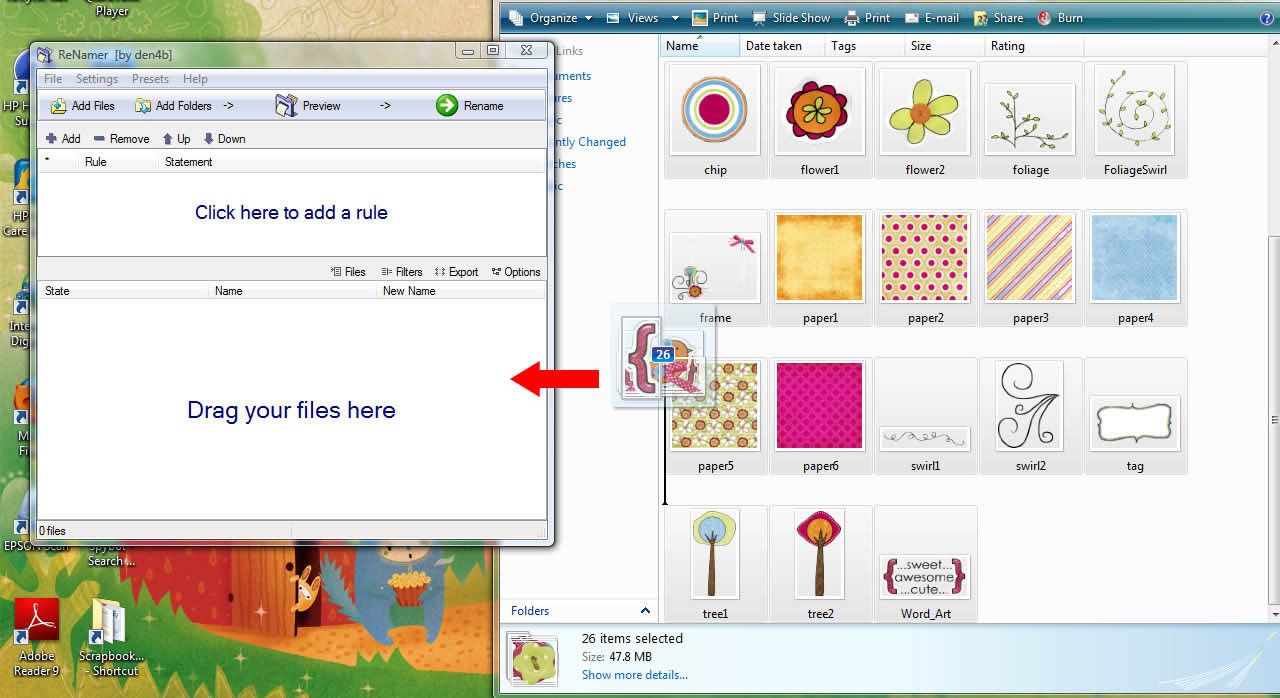
Now your files are loaded in ReNamer.
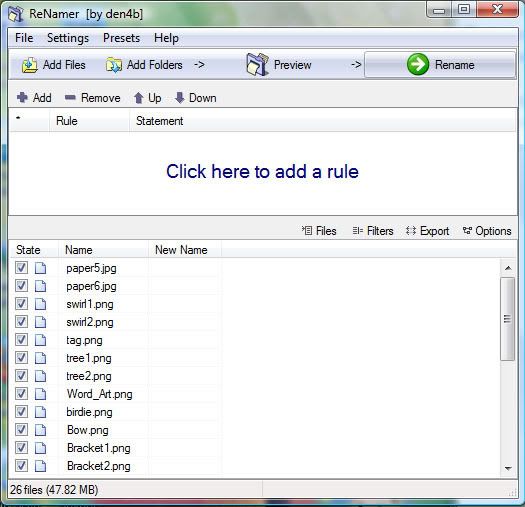
Next, click on "Add" to add a rule to rename the files.
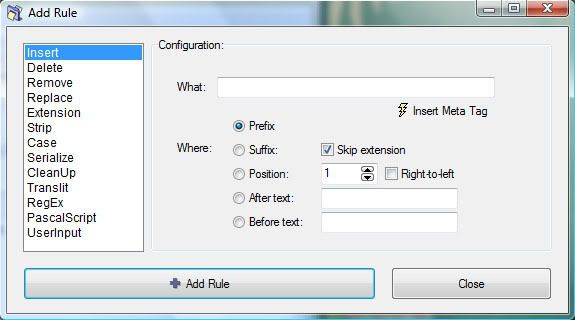
Below is the screen that opens. We are going to create a rule using "Insert" on the left.
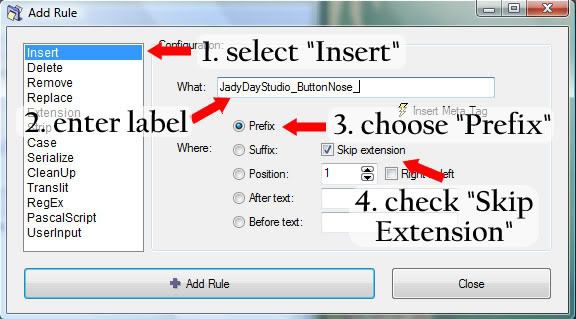
Next, place your cursor in the field next to "What:". We want to add the name of the designer and the kit name. I want to put this information in the front of the file name, so I select "Prefix" and make sure that "Skip Extension" is checked.
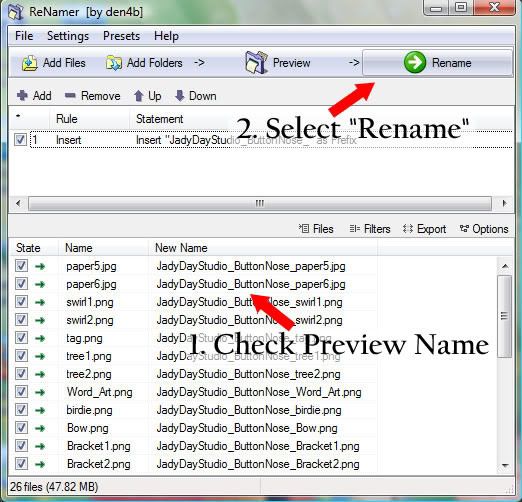
Once you have entered this information, you can click "Add Rule." This will close the window and return you to the original screen. In the screen you can now see a preview of what the file name will be with this rule you just created.
If you are happy with the new file name then you can go ahead with the renaming by clicking "Rename."
It will tell you if your renaming is successful. Click OK.
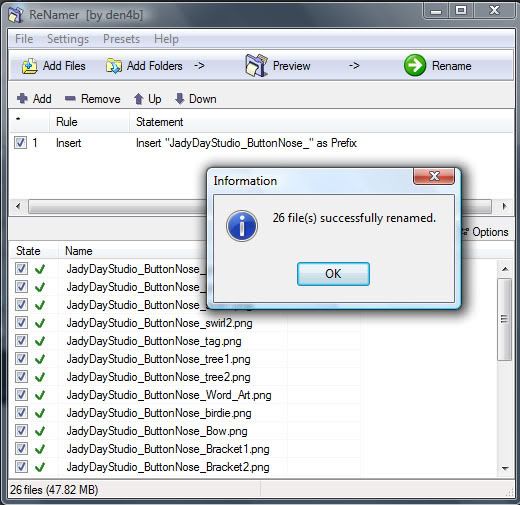
Now that these files are renamed you can remove them. Just select them (if you click in the window you can use "Ctrl+A" to select all) and hit the "delete" key. In the picture below I have selected all of the files, just before deleting.
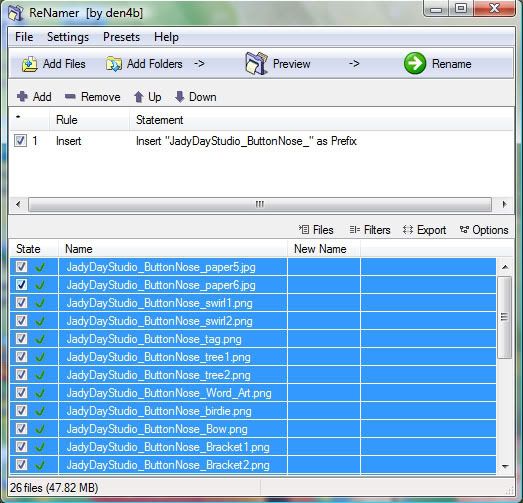
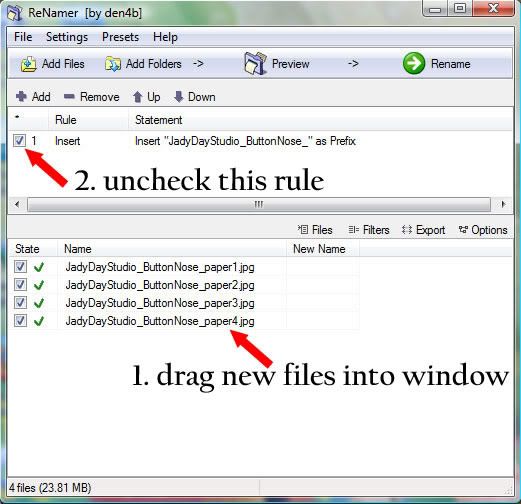
Now I want to change some other files. The designer has labeled the papers as "paper," which might work for you. But I like to use the search and when I search for paper I want to find notebook paper and things like that, not 1000s of papers, so I change "paper" to "ppr." It is just my way of creating it easy to search. So I drag the papers into ReNamer.
Then we need to turn off the rule we created above. Just check to turn it off. This is a cool technique because you can create several rules and work with many many files without having to rewrite rules each time you need to do something different.
Next click "Add."
This time we want to add another rule, using the Replace rule. So select "Replace." Then where it says "Find:" I will enter paper, and where it says "Replace:" I will enter ppr. Then click "Add Rule."
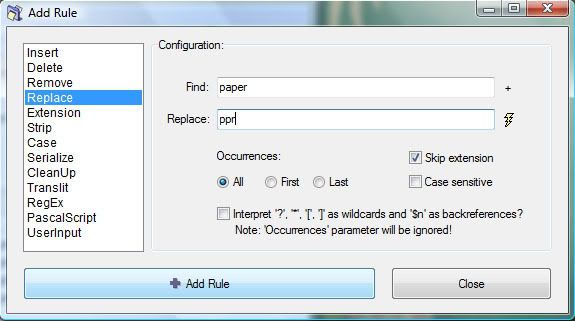
This will preview the new name. Select "Rename." And then click "OK".
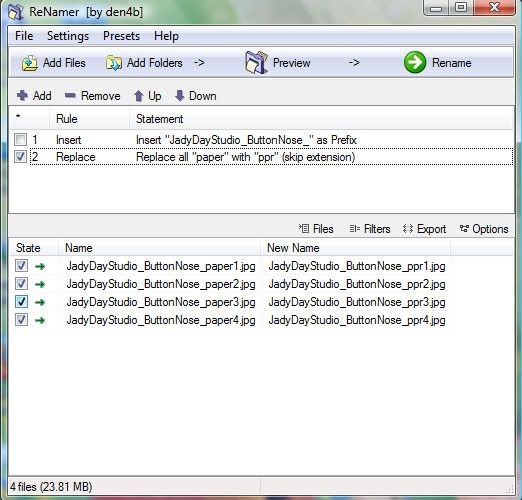
There, we are done renaming the files.
There is a lot more I can share with you about ReNamer, but I will save that for another night.
Here is where you can find ReNamer: http://www.den4b.com/downloads.php?project=ReNamer.
I know I said that I would give you some more tutorials from my layout the other day, but this one is relevant to what I am working with right now and wanted to share this. This is about what I use to organize my photos and digital scrapbooking files. I am not sure if people bother to organize their files and folders very much, but I do. I do it mainly so that I can find files later and always try to think ahead at what I might use to search for something later.
The best program I have found, and have been using it for years now, is called ReNamer by den4b. It is fantastic because it is so simple. At first I used it to organize my photos, and now have found it useful for digital scrapbooking.
Photos:
I keep all of the photos from the same date or event in a folder together. I name each of them according to the date the picture is taken and then I number them sequentially in the order they were taken. If the pictures were taken at a specific location (e.g., the Grand Canyon) or event (e.g., Christmas), I will add that after the date and serial number. If I have time, I will add who is in the picture at the end. Here's an example of a typical file name: 20080803_13_Brooklyn_MarkErin.jpg. I date my pictures with the year first, then the month, and then the day. I have found by trial and error that that is the best way to organize photos in some kind of orderly fashion. As you can see in this example, if I ever use the search to find pictures of my trip to Brooklyn or of Mark, both searches will yield this photograph. Well the focus is supposed to be on digi-scrapping files, so let us move on to that.
Digi-scrapping files:
Now I am new to digi-scrapping so this is still trial and error, but I will tell you about the system I am using right now to organize any kits I purchase or freebies I find online. First I group all items for one kit into one folder and name it {Kit_DesignersInitials_KitName}. I start with "Kit" so that all of the kits will group together. Then I like to have the work of the same designer side by side because I have a habit of remembering the name of the designer instead of kit names. So if I am looking for a kit, it is more likely that I will find it under the designers name.
Once inside the folder, I try to make sure everything in the folder has the same information as the folder. So I rename everything to start with {DesignerInitials_KitName}. I do this so that if I ever do a search for a tag, I will know exactly what kit the tag I am using came from just by the file name. Then I can find the designer's TOU (terms of use) in no time. It is easy to give appropriate credit when you know the name immediately. I also try to make sure common things like buttons, ribbons, pins, staples, tags, and paper are labeled in the file name so that I can do a quick search and find whatever I am looking for.
So what I wanted to do is tell you how to do all of this file renaming efficiently.
Tutorial:
First a disclaimer. I am sure that this program offers more than I know. I am just showing you some of the things I know to do with it.
Okay, so I am going to organize a folder that I downloaded from the SYTYCD contest at digiscrapaddicts.com (no longer available).
Now the first thing I do is find the TOU and the kit preview and put a underscore ("_") in front of these file names. This is my own thing, my own pet peev. I want to be able to find these two files anytime, and by doing this, these two files will be displayed as the first two files in the folder.
Now we can start using ReNamer.
Open ReNamer. Start by selecting all of the files that need to be renamed. To quickly do this use your mouse. Select the first file, hold down shift, scroll down, and then select the last file. Now drag all of those files into the bottom window of ReNamer that says "Drag your files here."
Now your files are loaded in ReNamer.
Below is the screen that opens. We are going to create a rule using "Insert" on the left.
Next, place your cursor in the field next to "What:". We want to add the name of the designer and the kit name. I want to put this information in the front of the file name, so I select "Prefix" and make sure that "Skip Extension" is checked.
Once you have entered this information, you can click "Add Rule." This will close the window and return you to the original screen. In the screen you can now see a preview of what the file name will be with this rule you just created.
If you are happy with the new file name then you can go ahead with the renaming by clicking "Rename."
It will tell you if your renaming is successful. Click OK.
Now that these files are renamed you can remove them. Just select them (if you click in the window you can use "Ctrl+A" to select all) and hit the "delete" key. In the picture below I have selected all of the files, just before deleting.
Now I want to change some other files. The designer has labeled the papers as "paper," which might work for you. But I like to use the search and when I search for paper I want to find notebook paper and things like that, not 1000s of papers, so I change "paper" to "ppr." It is just my way of creating it easy to search. So I drag the papers into ReNamer.
Then we need to turn off the rule we created above. Just check to turn it off. This is a cool technique because you can create several rules and work with many many files without having to rewrite rules each time you need to do something different.
Next click "Add."
This time we want to add another rule, using the Replace rule. So select "Replace." Then where it says "Find:" I will enter paper, and where it says "Replace:" I will enter ppr. Then click "Add Rule."
There is a lot more I can share with you about ReNamer, but I will save that for another night.
Here is where you can find ReNamer: http://www.den4b.com/downloads.php?project=ReNamer.
Saturday, June 6, 2009
Creating Cut Outs and a Layout for a Challenge
Note: tutorial further down in this post.
I created a new layout for a challenge I have entered at Scrap That Idea! The post about the challenge is here. For this challenge we were given an inspiration and had to come up with a layout.
Here is the inspiration:
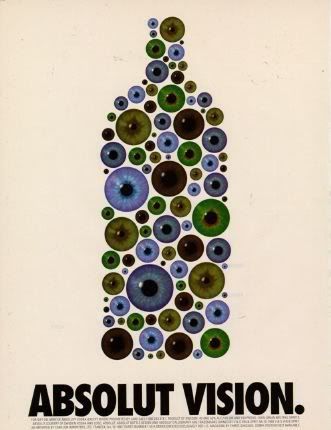
My translation of that is more literal than others. Mine is posted below, but you can visit the gallery and view everyone's layouts here.
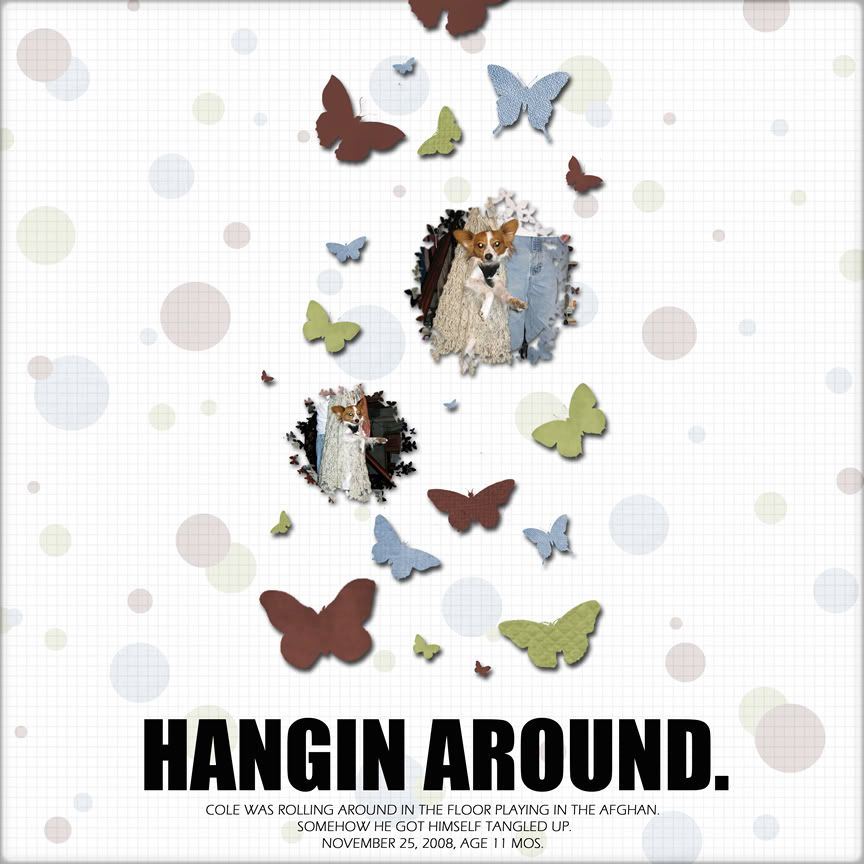
I created a new layout for a challenge I have entered at Scrap That Idea! The post about the challenge is here. For this challenge we were given an inspiration and had to come up with a layout.
Here is the inspiration:
My translation of that is more literal than others. Mine is posted below, but you can visit the gallery and view everyone's layouts here.
Credits:
Papers for background and butterflies - "Simplicity" by A Work in Progress & "2 Little Bots" by Stacey's Scraps
Papers for background and butterflies - "Simplicity" by A Work in Progress & "2 Little Bots" by Stacey's Scraps
I can offer you three Photoshop Elements (PSE) tutorials based off of this layout. The first I will discuss in this post called "cut outs" or what I did to create the butterfly shapes from the paper. The other two are how to create your own mask, like I did here using butterflies as you see in the pictures of my dog above; and how to create your own shadows. I will post the latter two tutorials later.
Tutorial
How to Create Cut Outs and Make Papers/Pictures into Shapes:
Okay, are you ready? Let's go. (Note: I try to show you every single step so this is really basic.)
To do this tutorial, you will need a paper or picture that you want to cut in a shape, and the shape you are going for. I am using butterflies like in my layout.
Part 1: Create a Cut Out/Shape
1.) Start by opening PSE and creating a new blank file. Make it big enough to hold your shape.
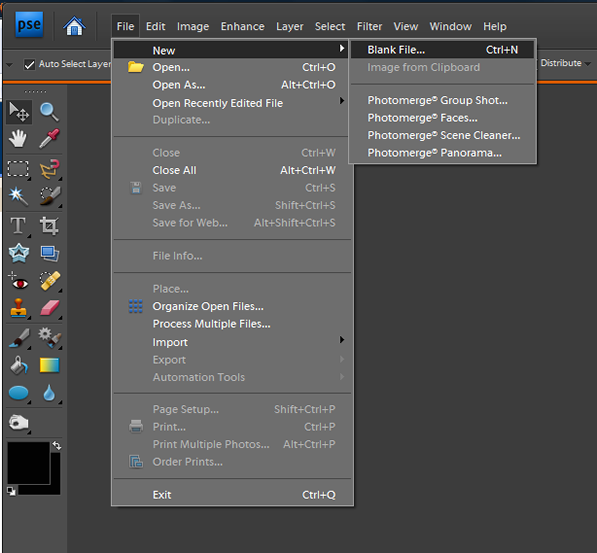
2.) Open the file that has the shape you want to use. My page is a bunch of butterflies.
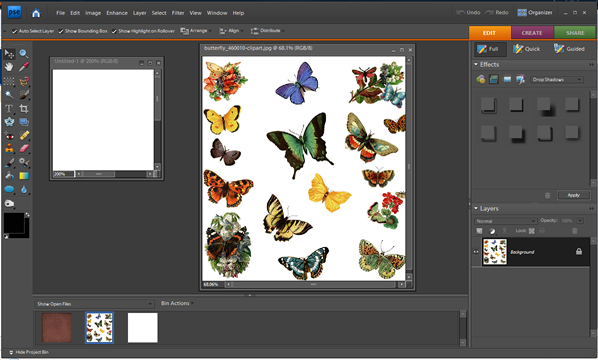
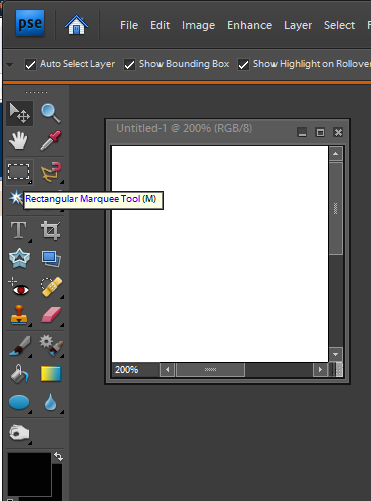
3.) Select the "Rectangular Marquee Tool".
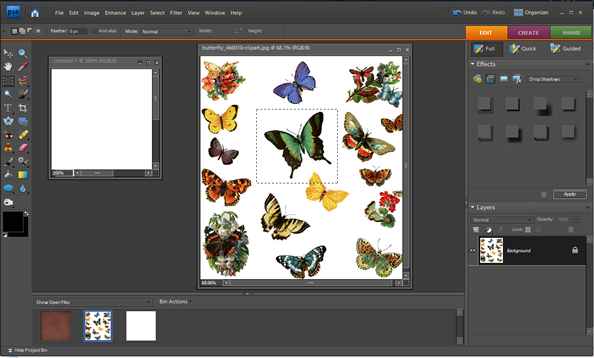
4.) Draw a rectangle around the shape you want to use.
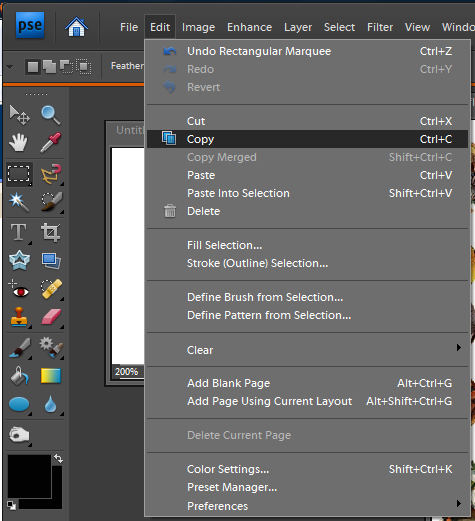
5.) Select Edit > Copy (or Ctrl+C) to copy the shape.
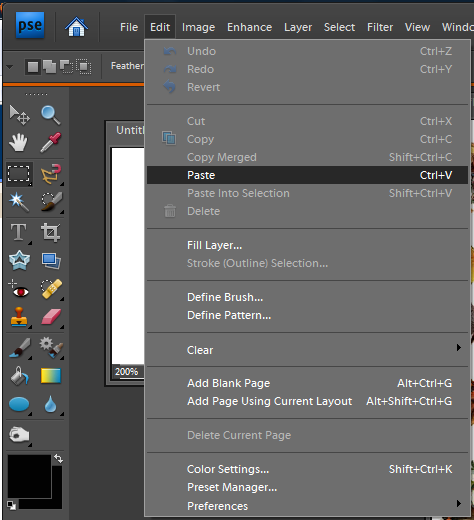
6.) Click on your "new" blank file, and then go to Edit > Paste (or Ctrl+V).
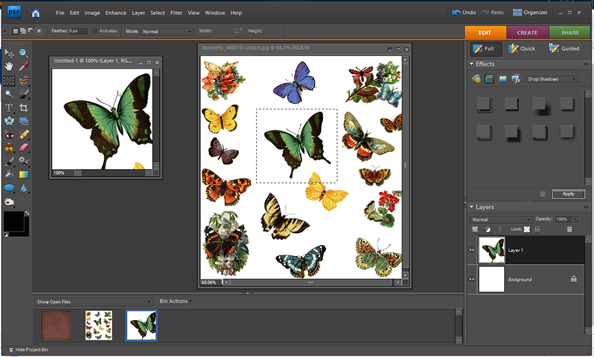
7.) Now you have the shape pasted into your new page.
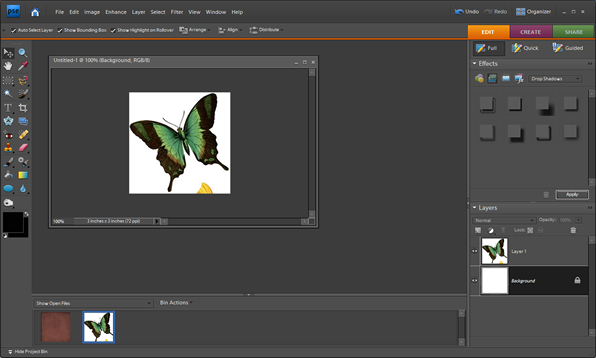
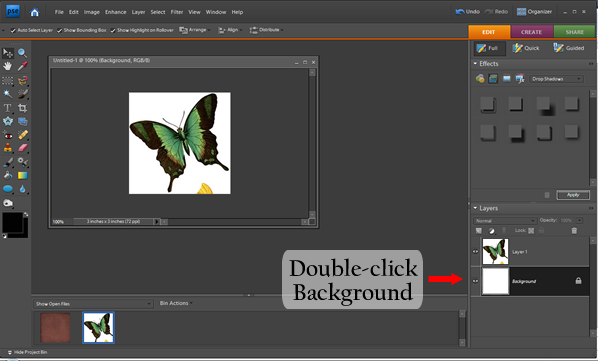
9.) Double-click on Background in the Layer Palette.
10.) Set the opacity of the background to 0%. This turns the background into a transparent layer.
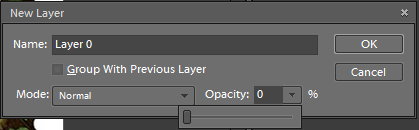
11.) Select the shape layer.
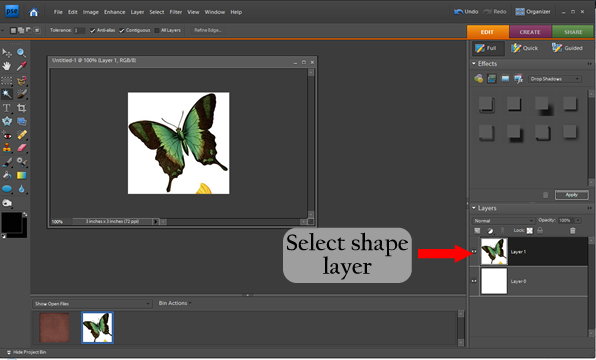
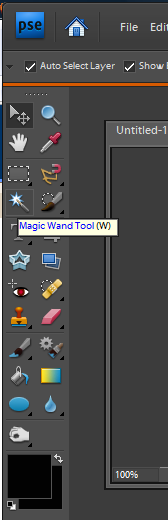
12.) Select the Magic Wand Tool.
13.) Adjust the tolerance so that the Magic Wand Tool selects the entire background and none of the pixels of the shape you are trying to extract. Here I set the Tolerance to 30. Click on the the background (in this case the white area) to extract it.
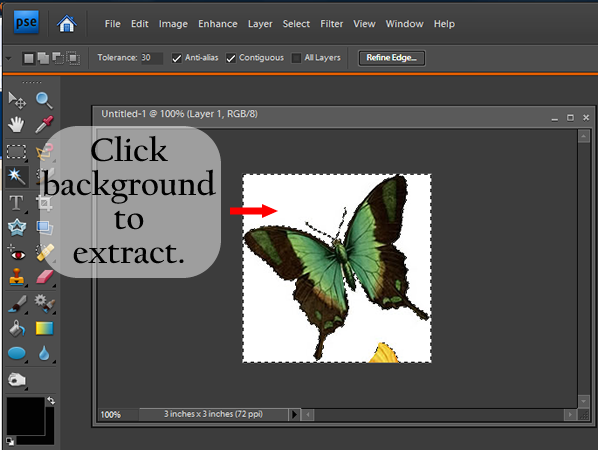
14.) Click delete to get rid of the background.
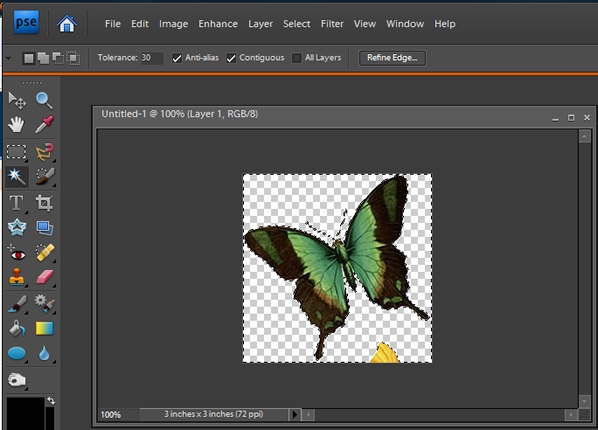
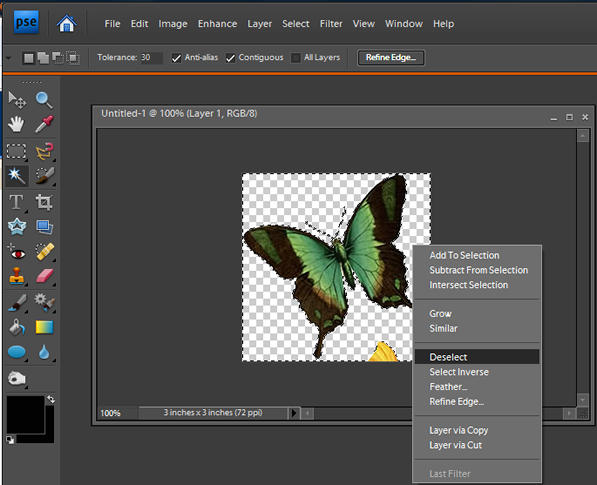
15.) Right-click and choose deselect (or Ctrl+D) to get rid of the marching ants.
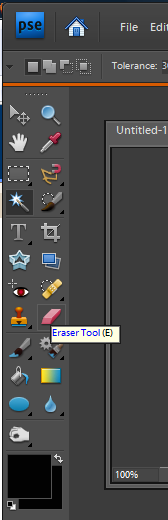
16.) Next, select the Eraser Tool.
17.) Use the eraser tool to erase any areas that did not delete when you used the magic wand.
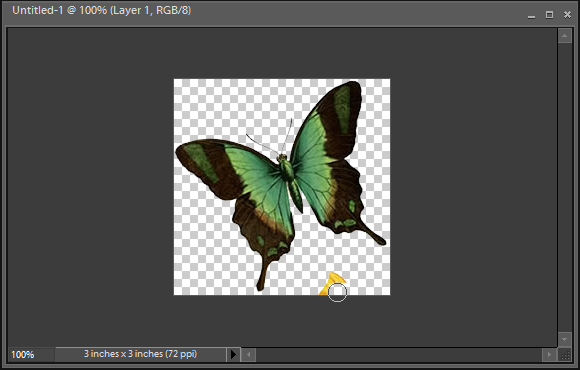
Now you have created what is called a "mask" in Photoshop. This mask is the shape that we use to cut our paper or photo.
Part 2: Make a Paper/Picture into a Shape
18.) Open the paper or picture that you are going to mask using the shape you just cut out.
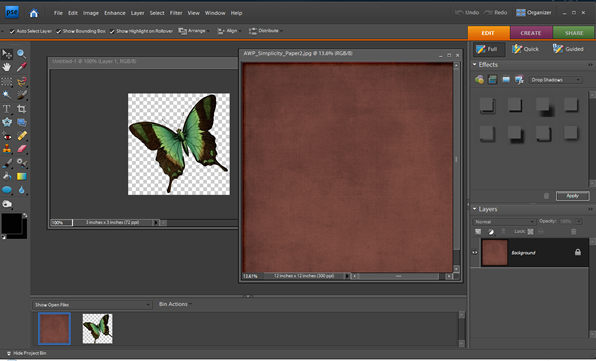
19.) Select the Move Tool.
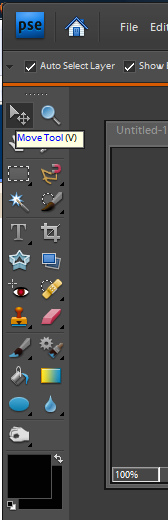
20.) Click on the shape. While still holding the mouse button down, drag the shape onto the paper or picture.
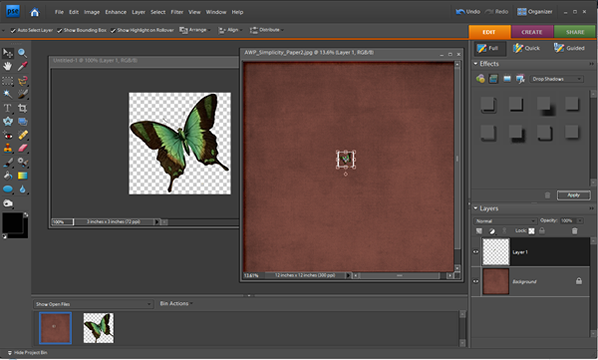
21.) In this scenario, the paper is the background. We want it to be a layer, so we will change that. To do that right-click on the background layer in the layer palette.
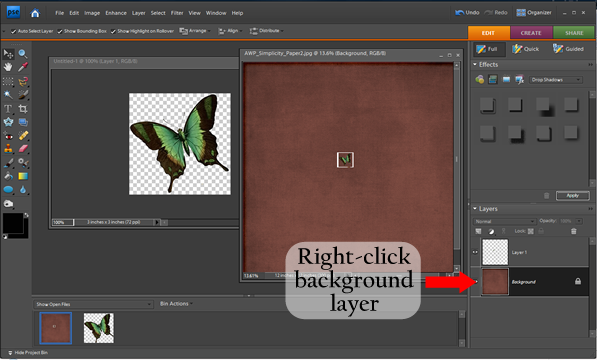
22.) In the menu that pops up, select "Layer From Background."
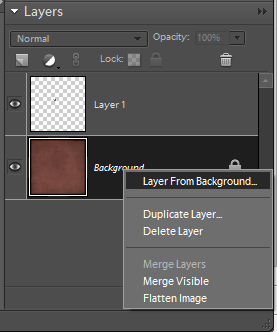
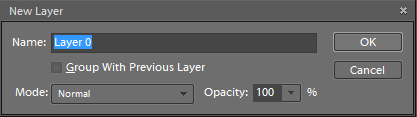
23.) In the box that opens, you can give this new "layer" (the paper layer) a name and click "Ok;" or bypass the naming and just click "Ok."
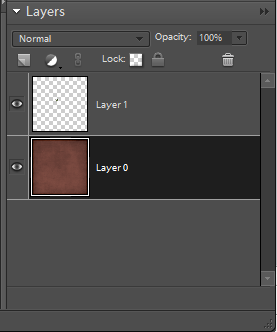
24.) Now you can see that the paper is its own layer.
25.) Drag the shape layer below the paper layer.
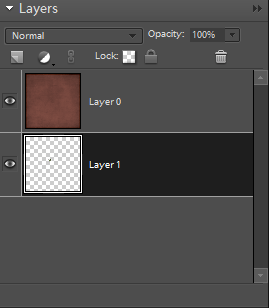
26.) Now, select the paper layer (the top layer). Then, go to Layer > Group With Previous (or Ctrl+G).
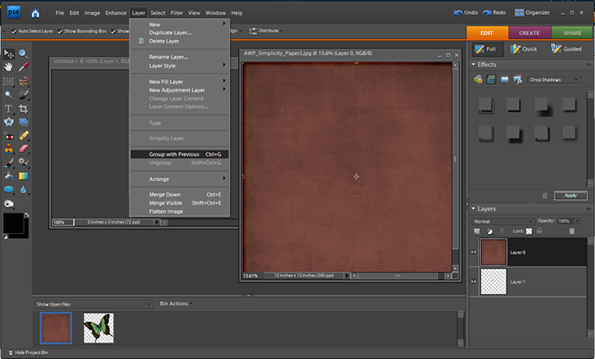
Below I have zoomed in on the results.
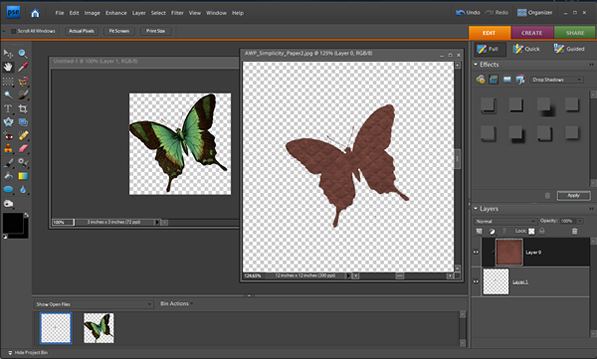
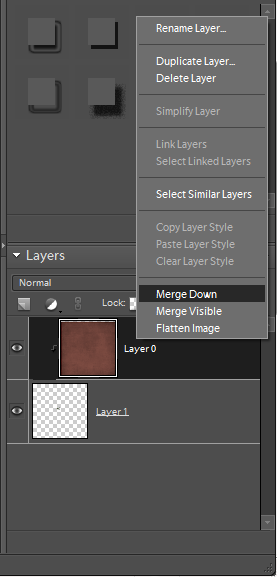
27.) Next, right click on the paper layer and choose "Merge Down."
28.) You are finished. The paper or picture is now in the shape of your cut out (AKA mask).
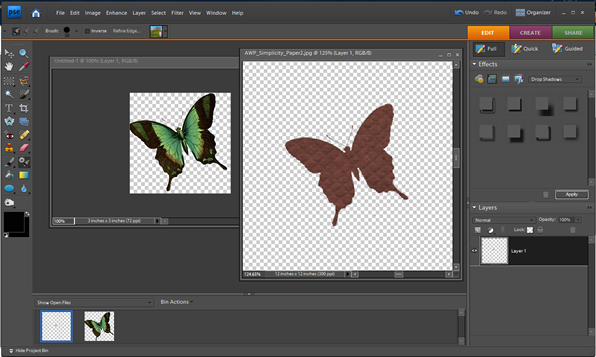
Credit: Brown paper from "Simplicity" by A Work in Progress
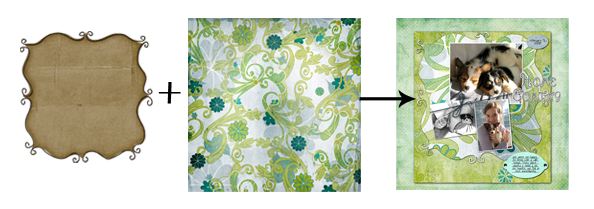
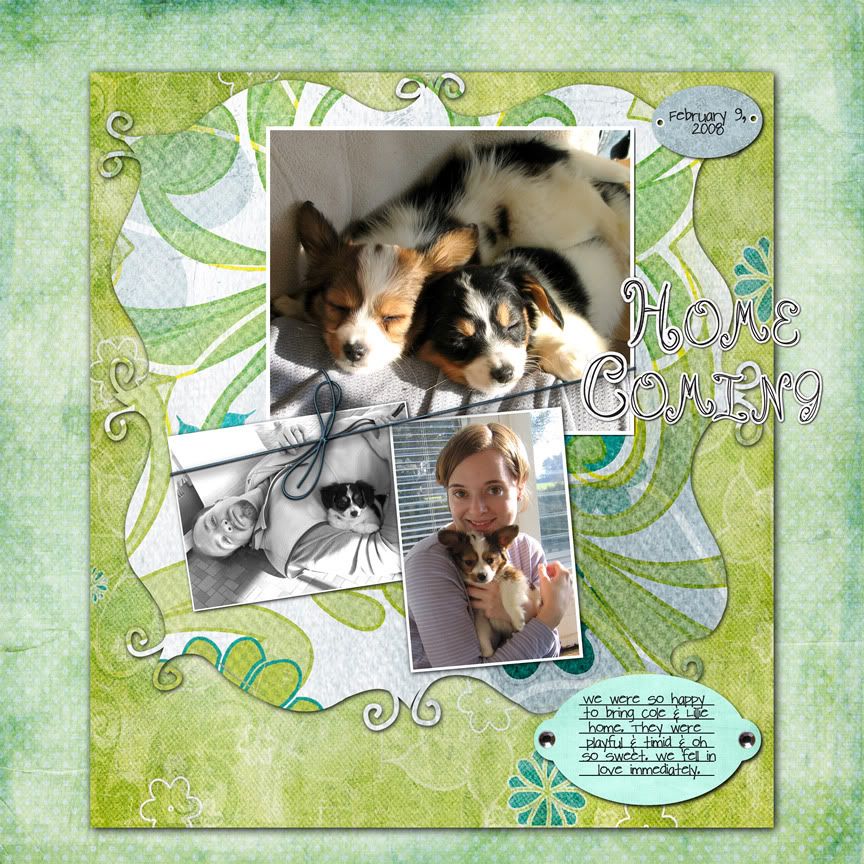
I used the same technique from Part 2 to create the mat behind the pictures in my last layout, "Home Coming."
Tutorial
How to Create Cut Outs and Make Papers/Pictures into Shapes:
Okay, are you ready? Let's go. (Note: I try to show you every single step so this is really basic.)
To do this tutorial, you will need a paper or picture that you want to cut in a shape, and the shape you are going for. I am using butterflies like in my layout.
Part 1: Create a Cut Out/Shape
1.) Start by opening PSE and creating a new blank file. Make it big enough to hold your shape.
5.) Select Edit > Copy (or Ctrl+C) to copy the shape.
6.) Click on your "new" blank file, and then go to Edit > Paste (or Ctrl+V).
7.) Now you have the shape pasted into your new page.
8.) Now you can close the shape page and simply view your "new" blank file that now has your shape on it.
9.) Double-click on Background in the Layer Palette.
10.) Set the opacity of the background to 0%. This turns the background into a transparent layer.
11.) Select the shape layer.
12.) Select the Magic Wand Tool.
13.) Adjust the tolerance so that the Magic Wand Tool selects the entire background and none of the pixels of the shape you are trying to extract. Here I set the Tolerance to 30. Click on the the background (in this case the white area) to extract it.
14.) Click delete to get rid of the background.
15.) Right-click and choose deselect (or Ctrl+D) to get rid of the marching ants.
16.) Next, select the Eraser Tool.
17.) Use the eraser tool to erase any areas that did not delete when you used the magic wand.
Part 2: Make a Paper/Picture into a Shape
18.) Open the paper or picture that you are going to mask using the shape you just cut out.
19.) Select the Move Tool.
20.) Click on the shape. While still holding the mouse button down, drag the shape onto the paper or picture.
21.) In this scenario, the paper is the background. We want it to be a layer, so we will change that. To do that right-click on the background layer in the layer palette.
22.) In the menu that pops up, select "Layer From Background."
23.) In the box that opens, you can give this new "layer" (the paper layer) a name and click "Ok;" or bypass the naming and just click "Ok."
24.) Now you can see that the paper is its own layer.
25.) Drag the shape layer below the paper layer.
26.) Now, select the paper layer (the top layer). Then, go to Layer > Group With Previous (or Ctrl+G).
Below I have zoomed in on the results.
27.) Next, right click on the paper layer and choose "Merge Down."
28.) You are finished. The paper or picture is now in the shape of your cut out (AKA mask).
I used the same technique from Part 2 to create the mat behind the pictures in my last layout, "Home Coming."
Credits:
- Mat from "My Secret Garden" by creations by Rachael at http://www.funkyplaygrounddesigns.com
- Floral Papers from "Spontaneous Delight" by Carrie Stephens (see post of layout above for credits)
- Mat from "My Secret Garden" by creations by Rachael at http://www.funkyplaygrounddesigns.com
- Floral Papers from "Spontaneous Delight" by Carrie Stephens (see post of layout above for credits)
Subscribe to:
Posts (Atom)


 Posts
Posts