Tuesday, June 30, 2009

Scrap Simple Challenge #2

I love doing challenges. It is great inspiration to create pages you would not otherwise create, and lot of the time, use pictures that would go un-scrapped.

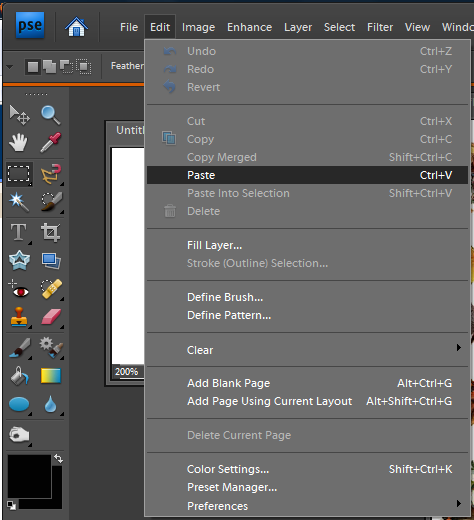
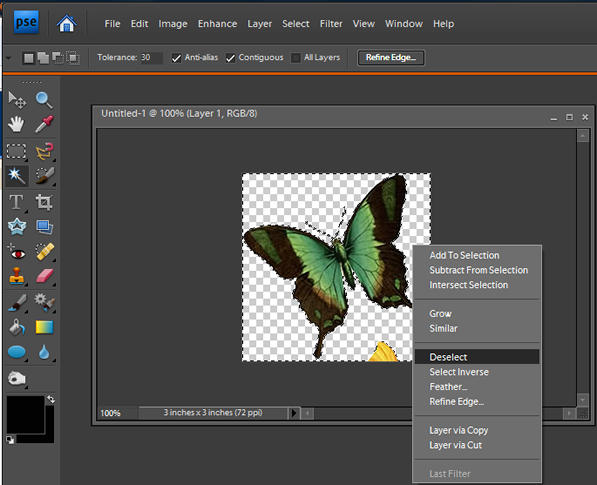
So I jumped in and did Simple Scrap #2 from the Simple Scrapper blog. Here are the rules:
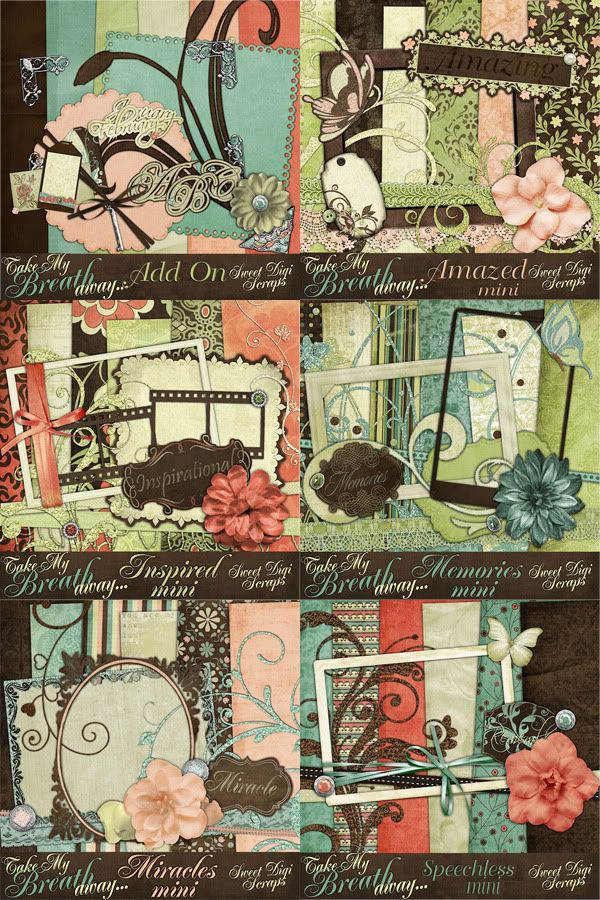
  • Scrap a layout using ANY mini-kit from your stash or this freebie mini-kit [image below].
  • You may include fonts, stitching or alphas but no papers or elements from outside the mini kit.
alternative text

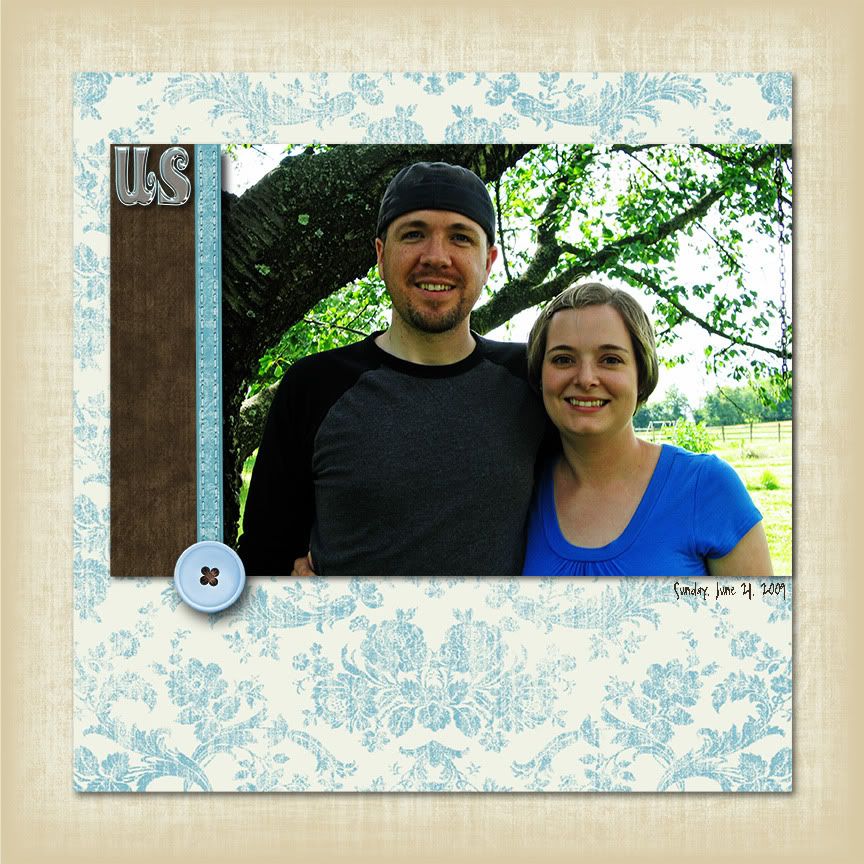
I decided to stick with the freebie she offered because it instantly made me think of a photo that I took that I could scrap. My page is, again, so simple. I am not sure I am pleased with it, but the directions made what I could do with it very limiting.
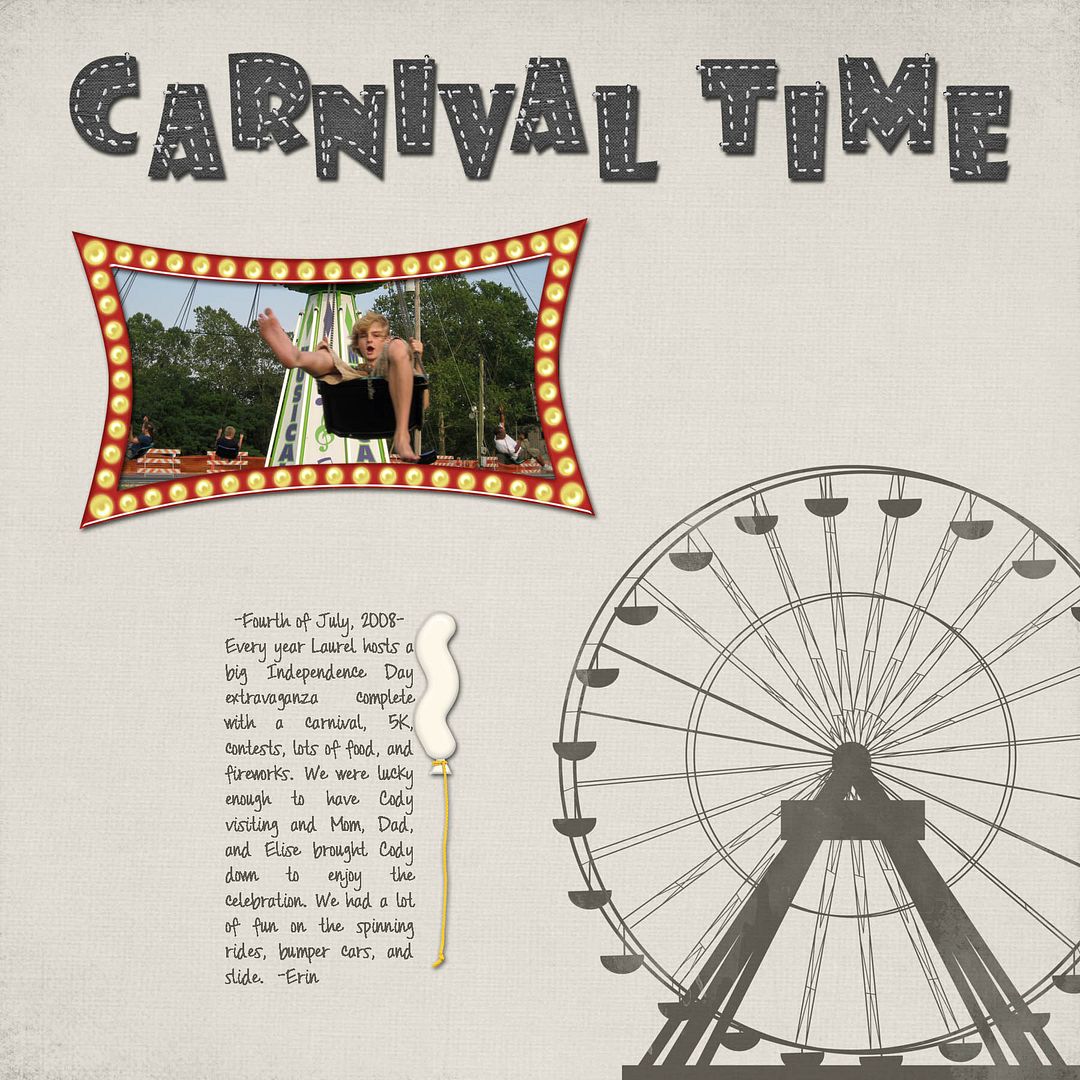
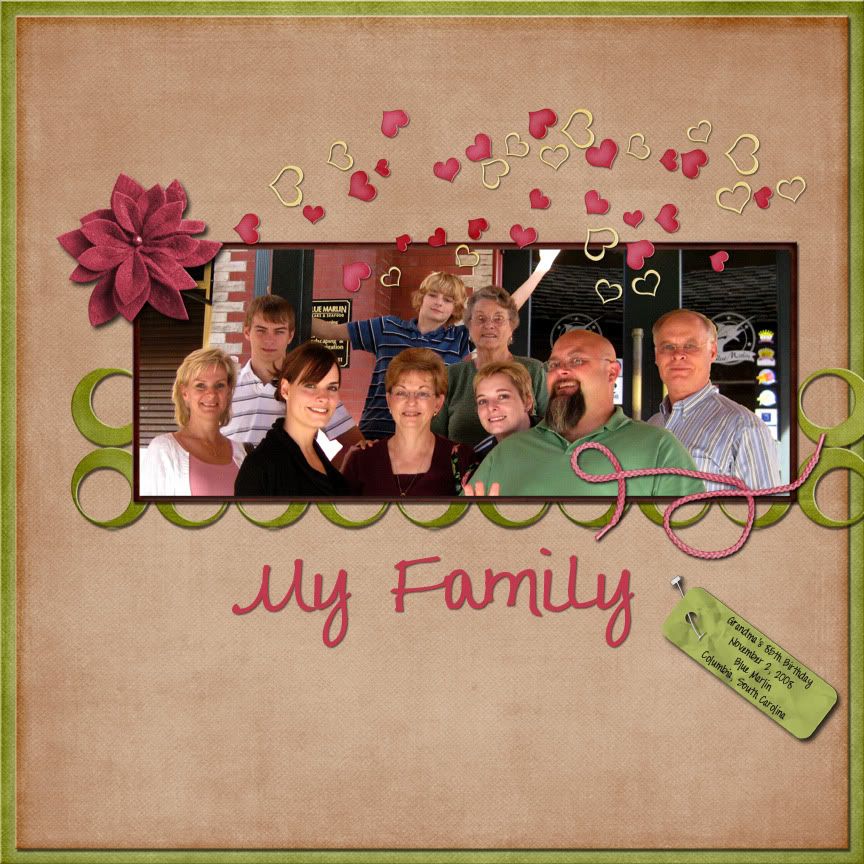
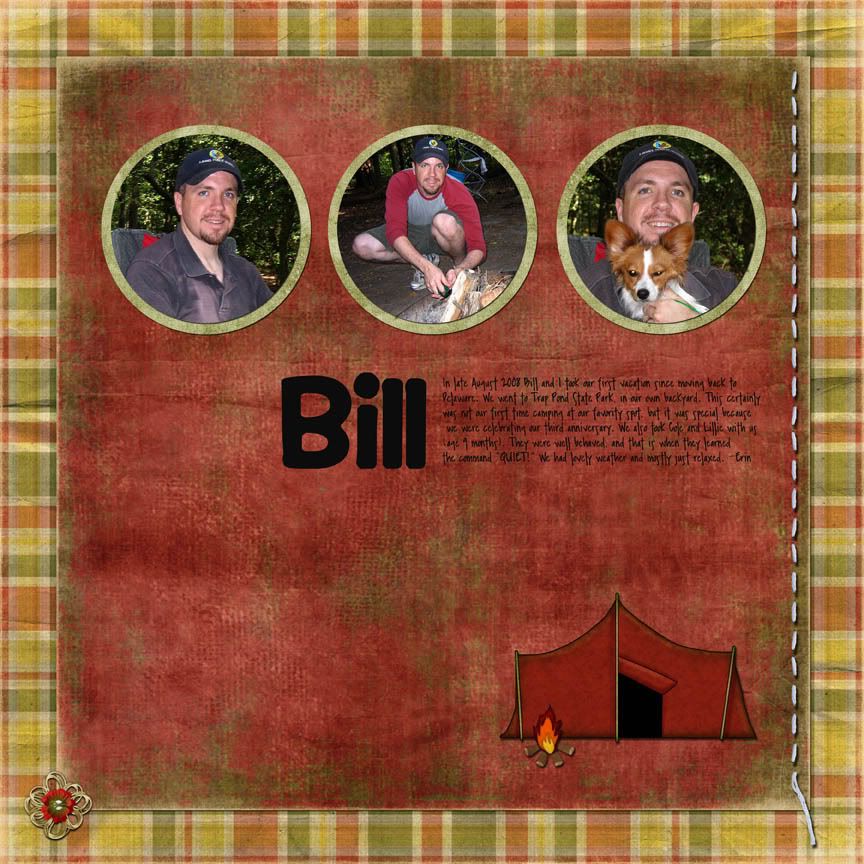
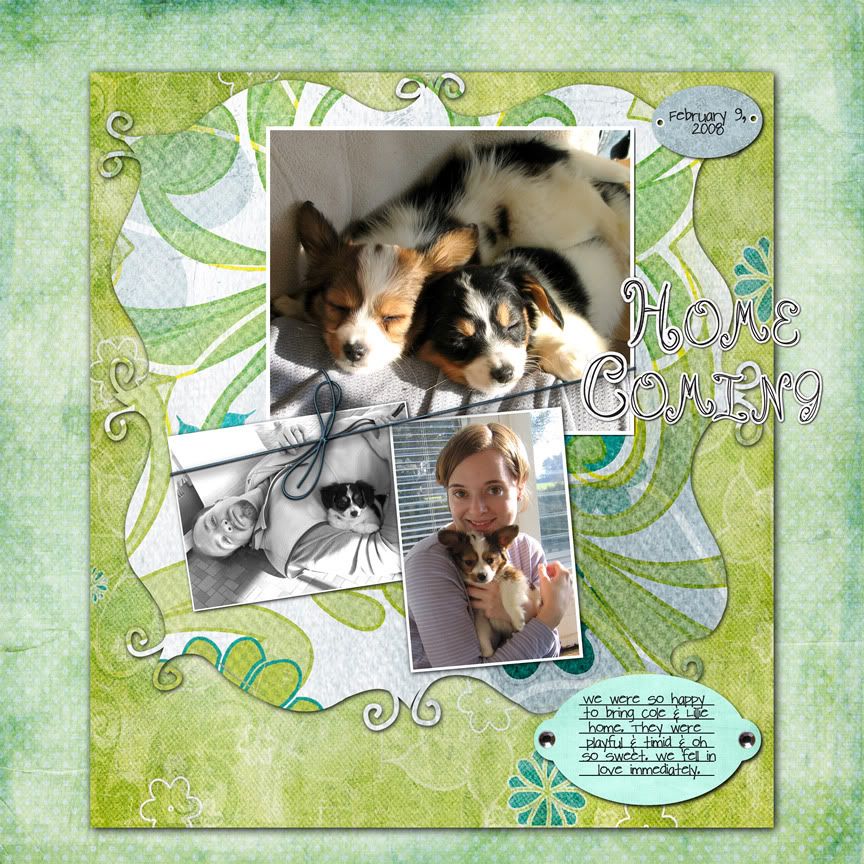
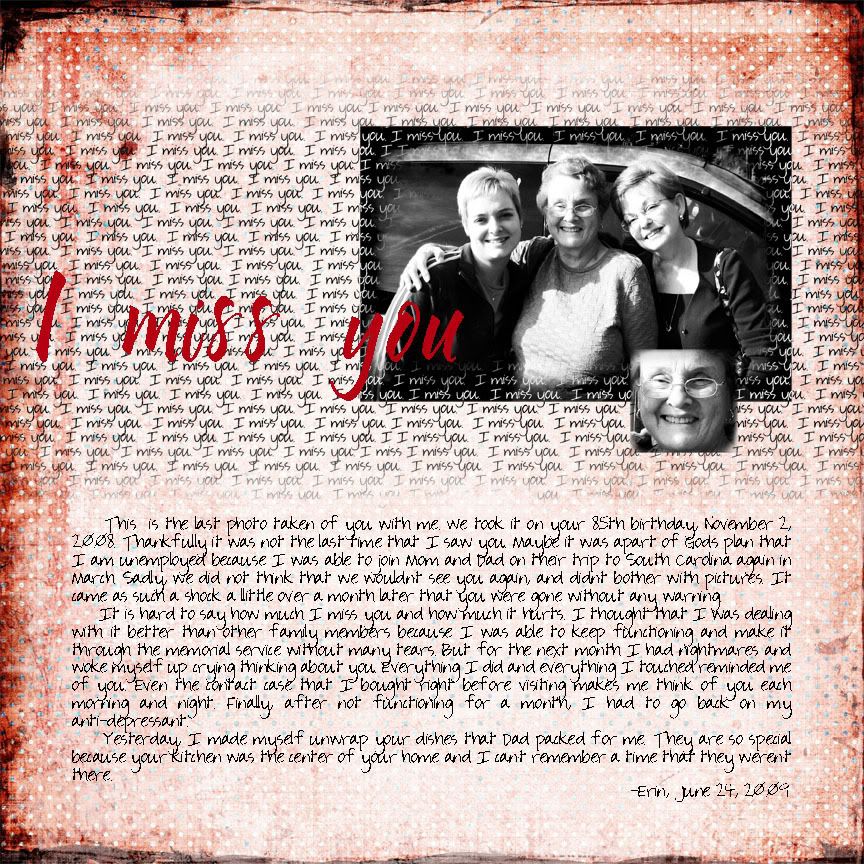
alternative text
CREDITS:
Kit: Circus Mini-Kit Freebie created by Pink Peacock Designs
Alpha: Alpha 04 created by Deca Designs
Journaling: "-Fourth of July, 2008- Every year Laurel hosts a big Independence Day extravaganza complete with a carnival, 5K, contests, lots of food, and fireworks. We were lucky enough to have Cody visiting and Mom, Dad, and Elise brought Cody down to enjoy the celebration. We had a lot of fun on the spinning rides, bumper cars, and slide. -Erin"

My Newest Layout

I did a speed scrap on Friday night and am just getting around to posting my layout today because I was sick over the weekend and went to visit my mom to go shopping (2 hours away) yesterday. We are going to have a big housewarming party at the end of the summer and I am preparing. Yesterday we bought the materials for me to recover my dining room chairs. Thank goodness for coupons---the price of foam is out of this world! But I digress... The photo I used for my layout was taken on Father's Day. I'm finding I like the look of the simplest of layouts, but prefer paper style.
US: Bill and Erin
CREDITS: Page Kit: Summer Driggs' Relax
Button: Abish Allen's Sun Kissed
Alpha: Mel Hains' Showers in Spring
Font: Pea Sara Print by Kevinandamanda.com
For some reason, when I scale down the size of my layouts to save for web the drop shadows get bigger and make things look like they are floating way up in the air. I don't like it, but don't have the patience to go back and fix it. Just know that the paper version doesn't look like this.

I found a really cute collaborative kit that I liked. I saw it at {we are} storytellers and thought I'd see what the price is at Little Dreamer Designs. Well it's $0.41 more expensive at Little Dreamer. I found that surprising---the price discrepancy. .

Wednesday, June 24, 2009

Last Photo Layout

I decided to participate in Digi Dare #138 at Digidares.com.
I really jumped in there---it was a tough challenge, but very cathartic I think.

The DARE:
Life has its ups and downs, the happy moments, but also the sad ones. The ecstatic highs, and the painful lows.
My dare this week is to scrap about those lows (emotional or physical pain). Yes, you can do it.
Think about what happened, how was your reaction to it and how did it affect you? Did it make you stronger or are you still coping with it.

The FLAIR:
-You can use a picture, or not. Use a stockphoto or something that symbolizes that pain.
-I want you to use your blending techniques. The papers, the elements, the picture, just blend something.
-Use the color that you associate with that pain.

Last Photo Layout

"Last Photo"
This photo represents my pain because it is the last photo of us taken together. It is a reminder that things are not permanent, that people and things in life are ephemeral, they are just moments. I used blending modes on the photo once I turned it black and white to give it a stronger contrast between black and white...a little sharper. I tried to keep it subtle. For some reason I felt that black and red really represents how I feel. Red can be such a raw color, like an open wound.

CREDITS:
Paper - from "Tiny Jewels" by Julia Makotinsky
Fonts: "Socially Awkward" and "My Nerd" both by KevinandAmanda.com

Tuesday, June 23, 2009

Another Speed Scrap: Stormdrain Marking

I participated in another speed scrap last night. They are so addictive! I love to get a layout done in just 2 hours without having to do much thinking about it. Plus it's great practice, I learn something new each time I do it.

So, here were the directions. I will bold the main instruction because she was a bit heavy on the narrative side.
1.) Today was an interesting day! I won’t bore you with all the details, but one important thing I did was sign up for a Twitter account! Now I can say “I ‘tweet’, do you?” lol Since the default colors of Twitter are blue and white, let’s use those as our main colors…choose any paper/papers with any combination of blue and white…that’s pretty broad, I’m sure you’ll come up with something wonderful! *Ü*

2.) Did you find some truly fantastic papers? Great! Twitter (in case you are curious) is a way to broadcast information…(similar to Facebook and MySpace)…let’s “broadcast” some photos! lol Use a photo collage or “spray” or cluster to distribute your photos. You should have at least three photos to do this…if you don’t have a frame cluster to use, here is a place to get one (or more) for free: http://www.storeide.se/gunhild/Scrapbooking.htm (she offers many choices on this page!)

how you all doing? got some lovely papers? got some photos? got a collage type thingy going on here?

3.) Did you surmise that Twitter’s symbol is a bird? I bet you did! And I’m sure you’ve already guessed this step, too! Add an animal…lucky you if one of your photos already has an animal in it! (Mine does!) Don’t forget to SAVE!!!

4.) My first post on Twitter was about this Speed Scrap…that first post, it’s the first thing you see…it’s a lot like a welcome mat, isn’t it? Add a “mat” to your layout…a bracket mat, a square, circle or other shape…any kind of “mat” – it could be paper, plastic, fencing, etc. Place it under your photos. Like your front porch, dress up your layout…embellish as desired!

5.) This is really cool…it took me a while to figure out how to do it, but I did! Twitterfeed will take whatever I post on my blog and duplicate it on my Twitter! Yay! Duplicate something in your layout! Hmmmm…wonder what you’ll duplicate?

6.) Having a blog and a tweet is a lot like having a title and a subtitle…take an alpha, make a simple title, then use a font to give it a subtitle! Hehehe….I hope you’re having as much fun as I am!

7.) Last step ladies…I’ll make this one easy…shadow as needed and journal if you want, and follow me on Ttwitter! http://twitter.com/merchimakesit That’s it! lol I hope you had a great time! I had a lot of fun making up these instructions, and I hope you had just as much fun following along!

And here is what I came up with:
alternative text
The journaling gets messy when I downsize the resolution. It says:
"On June 13, 2009, Bill, David, and I joined a group of about 30 volunteers to help the Delaware Department of Natural Resources and Environmental Control (DNREC) mark the stormdrains in Town. The markers we placed on each drain said "No dumping! Drains to Waterways."
"Stormdrain Marking"
CREDITS:
Papers and butterflys: "Earth Wings #2" by Julie Marie Designs
Cardboard mat and soda tops: "Earth Day" by Mary Wilde, Plum Dumpling Designs
Cluster frame: "Green" by Creashens
Alpha: "Promise Collection" by Shabby Princess Designs
Fonts: Cry Kitty & Pea So Lovely both by Kevinandamanda.com

Friday, June 19, 2009

Newest Layout: Approaching 30!

Just jumping on quickly to post my most recent layout.
alternative text29 3/4
CREDITS:
Wild Child page kit by Snowflake Beach Designs AKA Chanin Mettey
Date Stamp by WM [Squared] Designs - Simply Dated V2
Fonts - Pea Stacy Fancy & Pea So Lovely by Kevinandamanda.com

Monday, June 15, 2009

Recent Layouts of Grandma

I wanted to share two recent layouts that I have created. They are both of my grandma who passed away in late April. I miss her and think about her all the time. So she is the subject of my layouts. I have a couple of more planned.

First is one I created about 10 days ago. I just had not gotten around to posting it yet. It is about Grandma missing Granddaddy after he was gone.
alternative text
CREDITS: Papers, Rainbow, and String: "Rainy Afternoon" from SYTYCD by Amy Stoffel; Ray of Light: "Pretty Music" from SYTYCD Rnd 4 by Maelia Designs; Clouds: "Recycled" by Lyndsay Riches Designs; Rippled Frame: "Collab" by Manue; Frame: "Reverie" by Cocodigiscrapeuse; Postcard: "Antique Postcard Mini" by Helen Ehrenhofer; and Journal Strip: "Everyday" by Amy Sumrall.
The second I just finished this morning and it was for a scraplift challenge on ScrapThatIdea's blog. A scraplift is when you base your layout on another layout, you use it for inspiration, or as a basic sketch of how you want your layout to turn out. The layout we are scraplifting is by Vicki and looks like:
alternative text

This is what I came up with:
alternative text
CREDIT: "Simplicity" by A Work in Progress, Vicki Parker; Fonts: "Pea Squeaker" by Kevinandamanda.com; Tracy by ?

Friday, June 12, 2009

I won a coupon!

There was a RAK given away to one person that posted in a thread on the forum at {gottapixel}. And, much to my amazement, I won a $10 coupon to Digi Sweet Designs store! I was ecstatic!

So I have spent two days trying to decide what to get. I ended up getting a bundle of mini kits. It is called "Take My Breath Away...". Aren't they beautiful?

Take My Breath Away Collection

File Organization Tool Tutorial

How do you organize your files? Do you organize?!

I know I said that I would give you some more tutorials from my layout the other day, but this one is relevant to what I am working with right now and wanted to share this. This is about what I use to organize my photos and digital scrapbooking files. I am not sure if people bother to organize their files and folders very much, but I do. I do it mainly so that I can find files later and always try to think ahead at what I might use to search for something later.

The best program I have found, and have been using it for years now, is called ReNamer by den4b. It is fantastic because it is so simple. At first I used it to organize my photos, and now have found it useful for digital scrapbooking.

Photos:
I keep all of the photos from the same date or event in a folder together. I name each of them according to the date the picture is taken and then I number them sequentially in the order they were taken. If the pictures were taken at a specific location (e.g., the Grand Canyon) or event (e.g., Christmas), I will add that after the date and serial number. If I have time, I will add who is in the picture at the end. Here's an example of a typical file name: 20080803_13_Brooklyn_MarkErin.jpg. I date my pictures with the year first, then the month, and then the day. I have found by trial and error that that is the best way to organize photos in some kind of orderly fashion. As you can see in this example, if I ever use the search to find pictures of my trip to Brooklyn or of Mark, both searches will yield this photograph. Well the focus is supposed to be on digi-scrapping files, so let us move on to that.

Digi-scrapping files:
Now I am new to digi-scrapping so this is still trial and error, but I will tell you about the system I am using right now to organize any kits I purchase or freebies I find online. First I group all items for one kit into one folder and name it {Kit_DesignersInitials_KitName}. I start with "Kit" so that all of the kits will group together. Then I like to have the work of the same designer side by side because I have a habit of remembering the name of the designer instead of kit names. So if I am looking for a kit, it is more likely that I will find it under the designers name.

Once inside the folder, I try to make sure everything in the folder has the same information as the folder. So I rename everything to start with {DesignerInitials_KitName}. I do this so that if I ever do a search for a tag, I will know exactly what kit the tag I am using came from just by the file name. Then I can find the designer's TOU (terms of use) in no time. It is easy to give appropriate credit when you know the name immediately. I also try to make sure common things like buttons, ribbons, pins, staples, tags, and paper are labeled in the file name so that I can do a quick search and find whatever I am looking for.

So what I wanted to do is tell you how to do all of this file renaming efficiently.

Tutorial:
First a disclaimer. I am sure that this program offers more than I know. I am just showing you some of the things I know to do with it.

Okay, so I am going to organize a folder that I downloaded from the SYTYCD contest at digiscrapaddicts.com (no longer available).

Now the first thing I do is find the TOU and the kit preview and put a underscore ("_") in front of these file names. This is my own thing, my own pet peev. I want to be able to find these two files anytime, and by doing this, these two files will be displayed as the first two files in the folder.

Now we can start using ReNamer.

Open ReNamer. Start by selecting all of the files that need to be renamed. To quickly do this use your mouse. Select the first file, hold down shift, scroll down, and then select the last file. Now drag all of those files into the bottom window of ReNamer that says "Drag your files here."
alternative text

Now your files are loaded in ReNamer.
alternative text

Next, click on "Add" to add a rule to rename the files.
alternative text

Below is the screen that opens. We are going to create a rule using "Insert" on the left.
alternative text

Next, place your cursor in the field next to "What:". We want to add the name of the designer and the kit name. I want to put this information in the front of the file name, so I select "Prefix" and make sure that "Skip Extension" is checked.
alternative text

Once you have entered this information, you can click "Add Rule." This will close the window and return you to the original screen. In the screen you can now see a preview of what the file name will be with this rule you just created.

If you are happy with the new file name then you can go ahead with the renaming by clicking "Rename."
alternative text

It will tell you if your renaming is successful. Click OK.
alternative text

Now that these files are renamed you can remove them. Just select them (if you click in the window you can use "Ctrl+A" to select all) and hit the "delete" key. In the picture below I have selected all of the files, just before deleting.
alternative text

Now I want to change some other files. The designer has labeled the papers as "paper," which might work for you. But I like to use the search and when I search for paper I want to find notebook paper and things like that, not 1000s of papers, so I change "paper" to "ppr." It is just my way of creating it easy to search. So I drag the papers into ReNamer.

Then we need to turn off the rule we created above. Just check to turn it off. This is a cool technique because you can create several rules and work with many many files without having to rewrite rules each time you need to do something different.
alternative text

Next click "Add."

This time we want to add another rule, using the Replace rule. So select "Replace." Then where it says "Find:" I will enter paper, and where it says "Replace:" I will enter ppr. Then click "Add Rule."
alternative text

This will preview the new name. Select "Rename." And then click "OK".
alternative text

There, we are done renaming the files.

There is a lot more I can share with you about ReNamer, but I will save that for another night.

Here is where you can find ReNamer: http://www.den4b.com/downloads.php?project=ReNamer.

Thursday, June 11, 2009

and...A Class

I came across an announcement for a free class about photo editing at JessicaSprague.com and thought I'd pass it along. It appears to me to be for Photoshop users, but I figure even those of us that use Photoshop Elements can learn something from it.
alternative text

Wednesday, June 10, 2009

Speed Scrap Layout: Bill Camping 2008

I participated in another speed scrap last night. This time I was at www.stufftoscrap.com.

These are the directions we were given:
Step 1: Pick 3 pictures of the same person from the same event and crop them into circles
Step 2: Pick 2 papers only. One patterned and one solid. Use the patterned as your background and the solid how ever you want
Step 3: Arrange your pictures in a straight line not touching each other
Step 4: Use at least 3 embelleshments. May be recolored as long as it is different colors
Step 5: Add some stitching to your page
Step 6: Title your LO with the name of the person in your pictures
Step7: Add at least 5 Sentences of journaling, then add dropshadows and upload to the gallery

And here is what I came up with:
Bill camping 2008
(click image for larger view)
Credits:
Page Kit (papers, tent and flower elements) - "The Scouting Way Addon" {Freebie} from Raspberry Road Designs by Susan Darter;
Fire element - "My Favorite Things - National Park Fun" from Jady Day Designs by Yari Mower {SYTYCD};
Stitching element - "In This Moment" by Donna Duncombe
Alpha - Howser and Pea Sara Print from kevinandamanda.com
What do you think?

Saturday, June 6, 2009

Creating Cut Outs and a Layout for a Challenge

Note: tutorial further down in this post.
I created a new layout for a challenge I have entered at
Scrap That Idea! The post about the challenge is here. For this challenge we were given an inspiration and had to come up with a layout.

Here is the inspiration:
alternative text

My translation of that is more literal than others. Mine is posted below, but you can visit the gallery and view everyone's layouts here.
Hangin Around
Credits:
Papers for background and butterflies - "Simplicity" by A Work in Progress & "2 Little Bots" by Stacey's Scraps


I can offer you three Photoshop Elements (PSE) tutorials based off of this layout. The first I will discuss in this post called "cut outs" or what I did to create the butterfly shapes from the paper. The other two are how to create your own mask, like I did here using butterflies as you see in the pictures of my dog above; and how to create your own shadows. I will post the latter two tutorials later.

Tutorial
How to Create Cut Outs and Make Papers/Pictures into Shapes:
Okay, are you ready? Let's go. (Note: I try to show you every single step so this is really basic.)
To do this tutorial, you will need a paper or picture that you want to cut in a shape, and the shape you are going for. I am using butterflies like in my layout.

Part 1: Create a Cut Out/Shape
1.) Start by opening PSE and creating a new blank file. Make it big enough to hold your shape.
alternative text

2.) Open the file that has the shape you want to use. My page is a bunch of butterflies.
alternative text

3.) Select the "Rectangular Marquee Tool".
alternative text

4.) Draw a rectangle around the shape you want to use.
alternative text

5.) Select Edit > Copy (or Ctrl+C) to copy the shape.
alternative text

6.) Click on your "new" blank file, and then go to Edit > Paste (or Ctrl+V).
alternative text

7.) Now you have the shape pasted into your new page.
alternative text

8.) Now you can close the shape page and simply view your "new" blank file that now has your shape on it.
alternative text

9.) Double-click on Background in the Layer Palette.
alternative text

10.) Set the opacity of the background to 0%. This turns the background into a transparent layer.
alternative text

11.) Select the shape layer.
alternative text

12.) Select the Magic Wand Tool.
alternative text

13.) Adjust the tolerance so that the Magic Wand Tool selects the entire background and none of the pixels of the shape you are trying to extract. Here I set the Tolerance to 30. Click on the the background (in this case the white area) to extract it.
alternative text

14.) Click delete to get rid of the background.
alternative text

15.) Right-click and choose deselect (or Ctrl+D) to get rid of the marching ants.
Deselect

16.) Next, select the Eraser Tool.
choose eraser tool

17.) Use the eraser tool to erase any areas that did not delete when you used the magic wand.
erase
Now you have created what is called a "mask" in Photoshop. This mask is the shape that we use to cut our paper or photo.

Part 2: Make a Paper/Picture into a Shape
18.) Open the paper or picture that you are going to mask using the shape you just cut out.
erase

19.) Select the Move Tool.
Choose move tool

20.) Click on the shape. While still holding the mouse button down, drag the shape onto the paper or picture.
Drag onto paper

21.) In this scenario, the paper is the background. We want it to be a layer, so we will change that. To do that right-click on the background layer in the layer palette.
Drag onto paper

22.) In the menu that pops up, select "Layer From Background."
Layer from Background

23.) In the box that opens, you can give this new "layer" (the paper layer) a name and click "Ok;" or bypass the naming and just click "Ok."
Layer from Background

24.) Now you can see that the paper is its own layer.
Paper is now a layer

25.) Drag the shape layer below the paper layer.


26.) Now, select the paper layer (the top layer). Then, go to Layer > Group With Previous (or Ctrl+G).


Below I have zoomed in on the results.


27.) Next, right click on the paper layer and choose "Merge Down."


28.) You are finished. The paper or picture is now in the shape of your cut out (AKA mask).

Credit: Brown paper from "Simplicity" by A Work in Progress

I used the same technique from Part 2 to create the mat behind the pictures in my last layout, "Home Coming."

Credits:
- Mat from "My Secret Garden" by creations by Rachael at http://www.funkyplaygrounddesigns.com
- Floral Papers from "Spontaneous Delight" by Carrie Stephens (see post of layout above for credits)